netty
Java 网络编程 I/O 模型
BIO:同步并阻塞,服务器实现模式为一个连接一个线程,即客户端有连接请求时服务器端就需要启动一个线程处理。适用于连接数目较小且固定的架构,这种方式对服务器的机器资源要求较高,但编写出来的程序比较简单。
NIO:同步非阻塞,服务器用一个线程处理多个请求,客户端发送的连接请求都会注册到多路复用器上,它以轮询的方式处理注册到该复用器上的请求。适用于连接数目较多且连接比较短——轻操作的架构,例如聊天服务器,弹幕系统,服务器间通讯等。
Netty是基于NIO实现的一个框架
不同IO模型的对比
| 同步阻塞I/O | 伪异步I/O | 非阻塞I/O | 异步I/O | |
|---|---|---|---|---|
| 客户端个数:I/O线程 | 1:1 | M:N | M:1 | M:0 |
| I/O类型 | 阻塞 | 阻塞 | 非阻塞 | 非阻塞 |
NIO
NIO与BIO的区别
BIO以流的方式处理数据,NIO则以块的方式处理数据,块IO的效率比流IO的效率高很多
BIO阻塞,NIO不阻塞
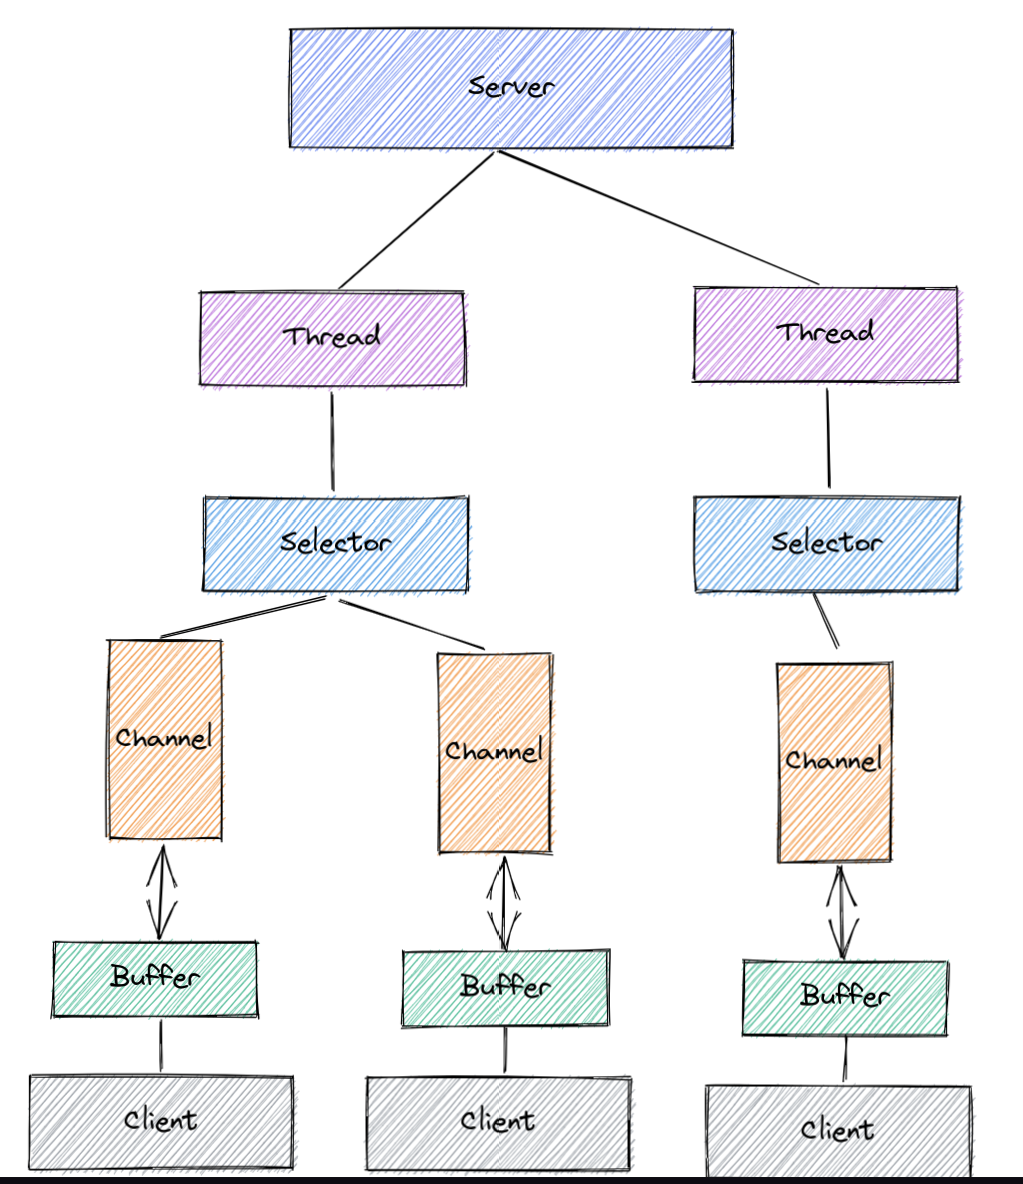
BIO基于字节流和字符流进行操作,因此他只能操作单一的连接。而NIO基于Channel和Buffer进行操作数据总是从通道中写入和读取。同时NIO引入了Selector用于监听多个通道的事件,实现单个线程处理多个客户端请求的目的。
NIO三大核心组件
- channel与buffer一一对应
- Selector对应一个线程,一个线程对应多个channel
- Selector会根据事件判断要切换到哪个Channel
- NIO的Buffer可读可写,只需要用flip方法切换读写状态。Channel也同样是双向的
Buffer与Channel的使用见on java [[on java#新IO系统]]
零拷贝技术
在传统的文件传输过程中需要:
4次拷贝:
- DMA将数据从磁盘搬运到内核缓冲区
- CPU将数据从内核缓冲区搬运到用户缓冲区
- CPU将数据从用户缓冲区搬运到内核socket缓冲区
- DMA将内核缓冲区中的数据搬运到网卡缓冲区
4次上下文切换:
用户读取文件时来回切换两次
用户将文件写入时来回切换两次
因此想要优化传统文件传输必然要从这两方面着手:
- 读取磁盘数据时,之所以会发生上下文切换,根源在于用户空间没有权限操作磁盘或网卡,因此相关的操作交给内核去完成。所以要想减少上下文切换次数需要减少系统调用次数
- 在数据传输过程中,将数据从内核缓冲区拷贝到用户空间,再从用户空间写入内核缓冲区,显然是没有意义的。因此在文件传输时,用户缓冲区没有存在的必要。
mmap + write
在上面的分析中,我们得出,传统IO速度慢的原因之一在于:用户空间在里面扮演了一个完全多余的角色,因此mmap的目的就是消除这个冗余角色。
mmap的具体过程:
- DMA将数据搬运到内核缓冲区后,mmap让应用缓冲区与OS共享这部分内存空间,这样就不需要再将数据拷贝到用户空间
- 用户发起写命令后,CPU直接将内核缓冲区的数据写入socket的缓冲区
- 最后DMA搬运socket缓冲区的数据到网卡
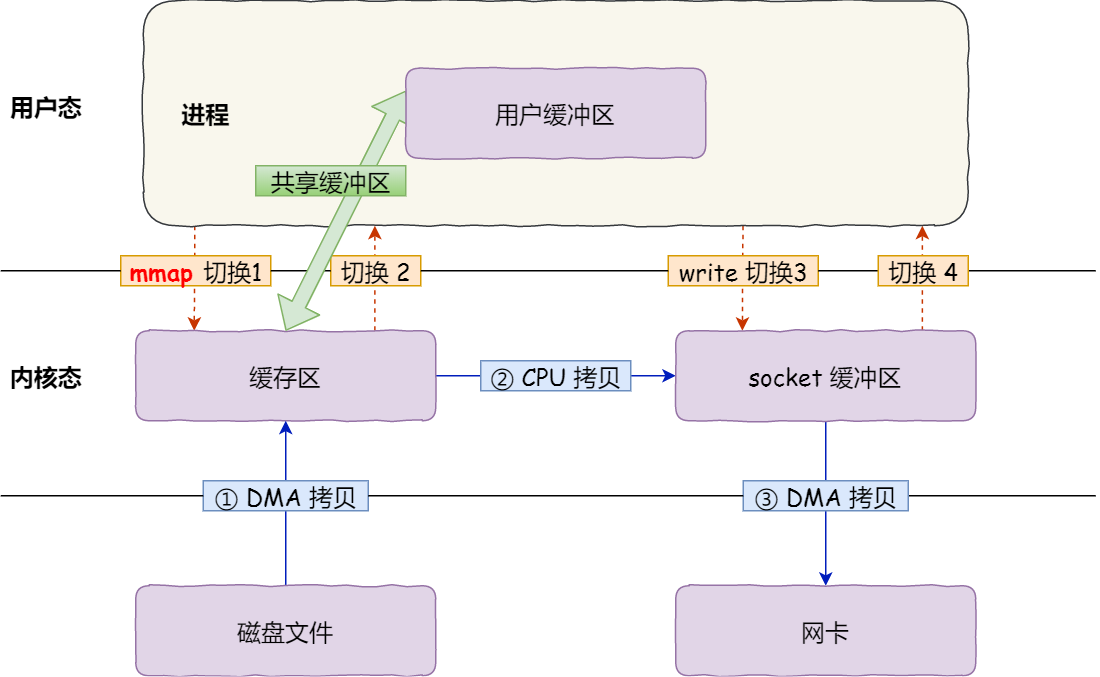
通过这种方式,我们减少了一次拷贝。但系统调用仍然是两次,上下文切换的次数并没有减少。
sendfile
在Linux2.1中,新增了一个专门发送文件的系统调用函数send_file()
#include <sys/socket.h>
ssize_t sendfile(int out_fd, int in_fd, off_t *offset, size_t count);
前两个参数是目的端和源端的文件描述符,后两个参数是源端的偏移量和复制数据的长度,返回值是实际复制数据的长度。
这个函数同时具备读和写的功能,因此他减少了1次系统调用也就是2次上下文切换的开销。
此外,他可以直接将内核缓冲区的数据拷贝到socket缓冲区当中,节省了一次数据拷贝。
这样就做到了仅用2次上下文切换与3次数据拷贝实现了文件传输。
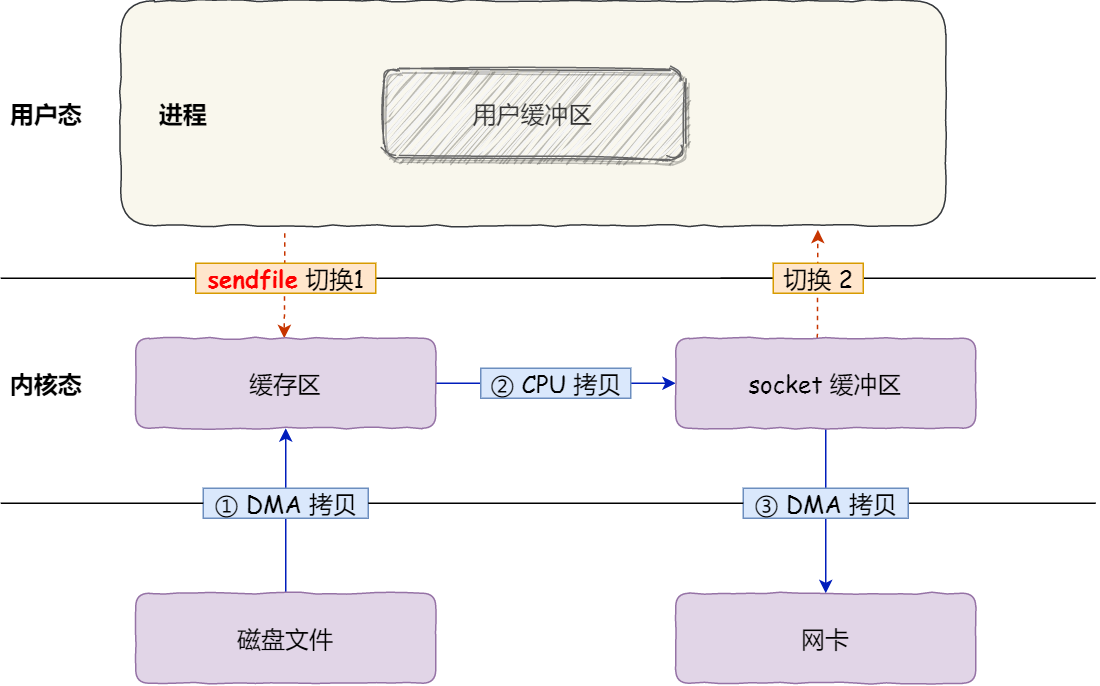
而Linux对于支持网卡SG-DMA技术的情况,可以实现更加快速的文件传输。具体流程为:
- 通过DMA将磁盘上的数据拷贝到内核缓冲区中
- 将缓冲区描述符和数据长度传到socket缓冲区,网卡的 SG-DMA 控制器可以直接将内核缓存中的数据拷贝到网卡的缓冲区里,此过程不需要将数据从操作系统内核缓冲区拷贝到 socket 缓冲区中,这样就减少了一次数据拷贝;
NIO使用入门
服务端
操作步骤:
- 启动一个Selector和服务端Socket管道。设置serverSocketChannel为非阻塞并将其绑定到指定IP地址和端口。接着将该Channel注册到Selector当中,并标记该Channel拥有ACCEPT请求的能力。
public MultiplexerTimeServer(int port) {
    try {
        selector = Selector.open();
        servChannel = ServerSocketChannel.open();
        servChannel.configureBlocking(false);
        // 第二个参数是backlog,表示已经建立的,可供通信的连接数
        servChannel.socket().bind(new InetSocketAddress(port), 1024);
        // 向selector注册服务器可处理的key
        servChannel.register(selector, SelectionKey.OP_ACCEPT);
        System.out.println("The time server is start in port: " + port);
    } catch (IOException e) {
        e.printStackTrace();
        System.exit(1);
    }
}- 让Selector轮询接收到请求的Channel,获取到与Channel绑定的key
@Override
public void run() {
    try {
        selector.select(1000);
        Set<SelectionKey> selectionKeys = selector.selectedKeys();
        for (SelectionKey selectionKey : selectionKeys) {
            try {
                handleInput(selectionKey);
            } catch (Exception e) {
                if (selectionKey != null) {
                    selectionKey.cancel();
                    if (selectionKey.channel() != null) {
                        selectionKey.channel().close();
                    }
                }
            }
        }
    } catch (Throwable t) {
        t.printStackTrace();
    }
    if (selector != null) {
        try {
            selector.close();
        } catch (IOException e) {
            e.printStackTrace();
        }
    }
}- 接收到key之后,首先判断这个key是否有效,如果key有效,再判断这个key是否能够接收请求。如果可以就从这个key中取出对应的Socket连接,并接收服务端的输入。
private void handleInput(SelectionKey key) throws IOException {
    if (key.isValid()) {
        if (key.isAcceptable()) {
            ServerSocketChannel ssc = (ServerSocketChannel) key.channel();
            SocketChannel sc = ssc.accept();
            ByteBuffer readBuffer = ByteBuffer.allocate(1024);
            int readBytes = sc.read(readBuffer);
            if (readBytes > 0) {
                readBuffer.flip();
                byte[] bytes = new byte[readBuffer.remaining()];
                readBuffer.get(bytes);
                String body = new String(bytes, StandardCharsets.UTF_8);
                System.out.println("The time server receive order: " + body);
                String currentTime = "QUERY TIME ORDER".equalsIgnoreCase(body) ? new Date(System.currentTimeMillis()).toString() : "BAD ORDER";
                doWrite(sc, currentTime);
            } else if (readBytes < 0) {
                key.cancel();
                sc.close();
            }
        }
    }
}
客户端
客户端的基本操作还是跟服务端类似,都需要先获取Selector和Socket连接,并将Socket注册进去。
public TimeClientHandle(String host, int port) {
    this.host = host == null ? "127.0.0.1" : host;
    this.port = port;
    try {
        selector = Selector.open();
        socketChannel = SocketChannel.open();
        socketChannel.configureBlocking(false);
    } catch (IOException e) {
        throw new RuntimeException(e);
    }
}
但客户端的在建立完基础设施后,首先要尝试对服务端进行连接
private void doConnect() throws IOException {
    if (socketChannel.connect(new InetSocketAddress(host, port))) {
        socketChannel.register(selector, SelectionKey.OP_READ);
        doWrite(socketChannel);
    } else {
        socketChannel.register(selector, SelectionKey.OP_CONNECT);
    }
}值得注意的是,在这里如果connect返回true就代表服务端已经返回了ACK,将对应的key注册到selector中,并标注他为可读取的key。但如果返回的是false,也不代表连接失败,只是服务端还没有返回ack,因此这里也要把他注册到selector中,当服务端的ack到达时,selector轮询到该key就可以将它标注为已就绪的key。
除此以外,客户端在处理收到的响应时也稍有不同,首先要判断这个key是否有效。接着要判断该key是否已经完成了连接(因为在注册的时候,有一部分key标注为正在连接),如果完成了连接,就将它注册为可读的key。然后判断这个key是否可读,可读的话就从channel中读取响应。
private void handleInput(SelectionKey key) throws IOException {
    if (key.isValid()) {
        SocketChannel sc = (SocketChannel) key.channel();
        if (key.isConnectable()) {
            if (sc.finishConnect()) {
                sc.register(selector, SelectionKey.OP_READ);
                doWrite(sc);
            } else {
                System.exit(1);
            }
        }
        if (key.isReadable()) {
            ByteBuffer readBuffer = ByteBuffer.allocate(1024);
            int readBytes = sc.read(readBuffer);
            if (readBytes > 0) {
                readBuffer.flip();
                byte[] bytes = new byte[readBuffer.remaining()];
                readBuffer.get(bytes);
                String body = new String(bytes, StandardCharsets.UTF_8);
                System.out.println("Now is " + body);
                this.stop = true;
            } else if (readBytes < 0) {
                key.cancel();
                sc.close();
            }
        }
    }
}
Netty
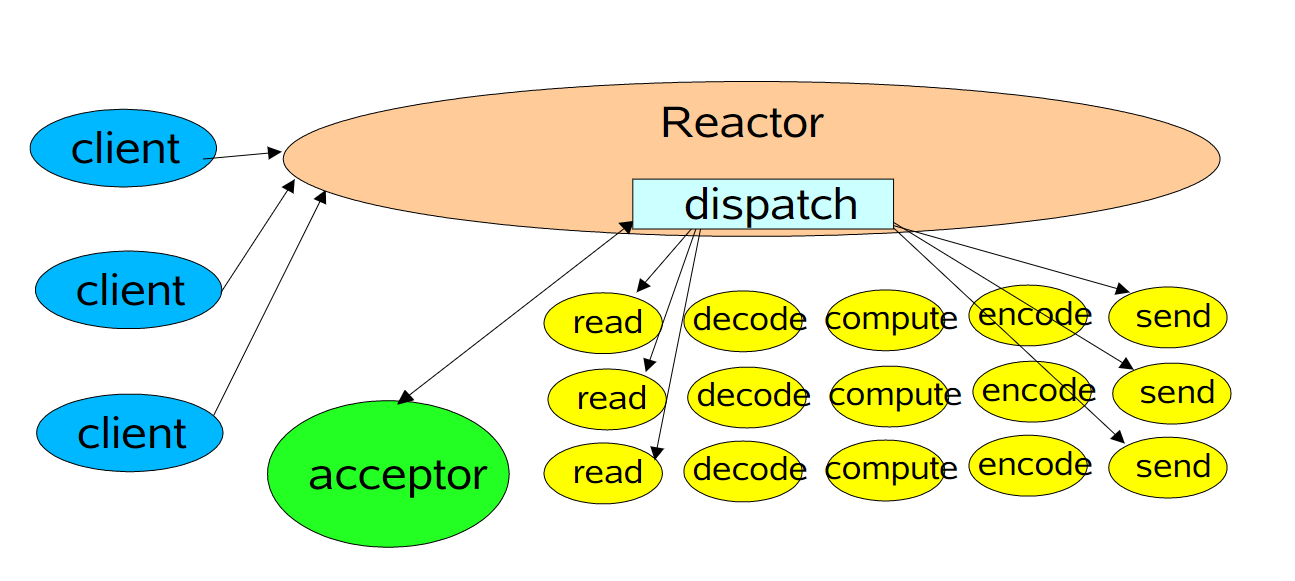
Reactor模型
Netty是基于Reactor模型的网络框架,因此在介绍Netty之前需要先介绍一下Reactor模型。
Reactor模型的核心在于:
- 事件驱动
- 可以处理一个或多个输入源
- 通过多路复用将请求事件分发给对应的处理器处理
Reactor模型中主要有三个角色:
- Reactor:将I/O事件分配给对应的handler处理
- Acceptor:处理客户端连接事件
- Handler:处理非阻塞任务
单Reactor线程模型
Reactor负责处理事件并分发事件,将连接事件交给acceptor,其他事件交给handler处理。始终只有一个线程处理请求。
这种模型的缺点非常明显,单线程模型在高并发环境下可能带来严重的性能问题。
单Reactor多线程模型
为了修改上面的模型的缺陷,引入了池化技术。因为单线程模型的性能缺陷在于,业务处理可能非常繁重,导致单个线程处理缓慢,造成事件堆积。因此通过加入线程池的方法,将业务处理分离出来,交给线程池处理。Reactor线程只负责连接建立以及读写操作。
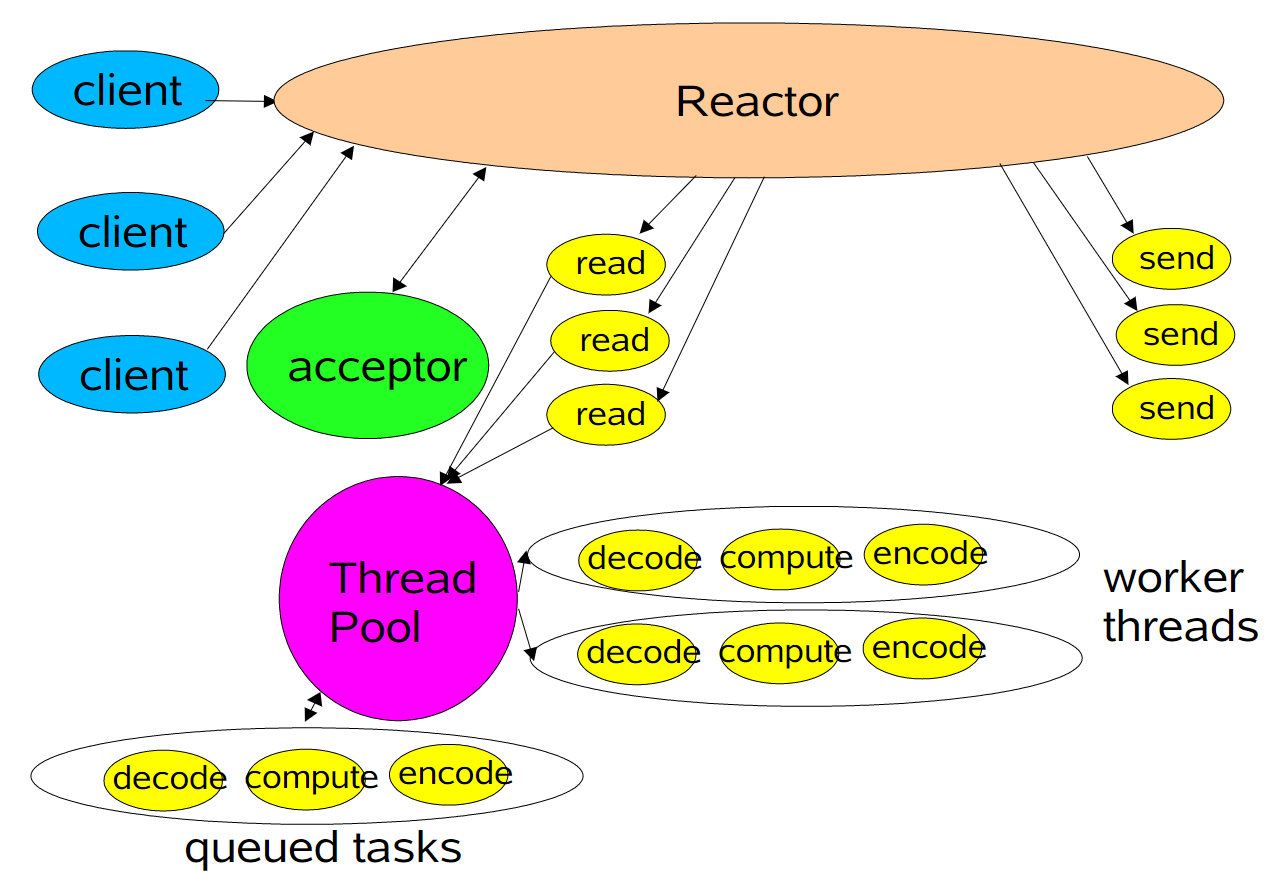
虽然引入了池化技术,但连接的建立以及网络I/O依旧由单个线程处理,性能问题依旧存在。
多Reactor多线程模型

在这种模型中,将Reactor拆分为mainReactor和subReactor两个部分,mainReactor只负责处理连接事件,一般一个线程足矣。subReactor负责处理读写事件,数量和CPU核心数相等。这种模型使各个模块职责单一,降低了耦合度。Netty的主从线程模型就是这种模型的一种实现。
使用入门
NioEventLoopGroup是一个线程组,它包含一组NIO线程专门用于网络事件的处理。这里使用的是多Reactor多线程模式,bossGroup作为主Reactor负责处理连接事件,workerGroup负责读写事件的处理。接着设置创建的Channel为NioServerSocketChannel。最后设置Handler专门负责处理请求。ChildChannelHandler获取socketChannel的管道,并将一个处理器添加到管道当中。
最后调用bind函数让服务器监听指定端口,并使用sync方法等待返回结果。
public class TimeServer {

    public void bind(int port) {
        EventLoopGroup bossGroup = new NioEventLoopGroup();
        EventLoopGroup workerGroup = new NioEventLoopGroup();
        try {
            ServerBootstrap b = new ServerBootstrap();
            b.group(bossGroup, workerGroup)
                    .channel(NioServerSocketChannel.class)
                    .option(ChannelOption.SO_BACKLOG, 1024)
                    .childHandler(new ChildChannelHandler());
            ChannelFuture f = b.bind(port).sync();
            f.channel().closeFuture().sync();
        } catch (InterruptedException e) {
            throw new RuntimeException(e);
        } finally {
            bossGroup.shutdownGracefully();
            workerGroup.shutdownGracefully();
        }
    }

    private static class ChildChannelHandler extends ChannelInitializer<SocketChannel> {

        @Override
        protected void initChannel(SocketChannel socketChannel) throws Exception {
            socketChannel.pipeline().addLast(new TimeServerHandler());
        }
    }

    public static void main(String[] args) {
        int port = 8080;
        new TimeServer().bind(port);
    }
}
处理器的操作
利用netty提供的字节缓冲区ByteBuf进行读取和写入操作。需要注意的是,netty并不会在消息写入之后就立即发送,过于频繁的唤醒Selector进行消息发送会拖慢系统性能,因此需要自行调用flush方法让netty将缓冲区的数据写入到SocketChannel当中。
public class TimeServerHandler extends ChannelHandlerAdapter {

    @Override
    public void channelRead(ChannelHandlerContext ctx, Object msg) throws Exception {
        ByteBuf buf = (ByteBuf) msg;
        byte[] req = new byte[buf.readableBytes()];
        buf.readBytes(req);
        String body = new String(req, StandardCharsets.UTF_8);
        System.out.println("The Time Server received order: " + body);
        String currentTime = "QUERY TIME ORDER".equalsIgnoreCase(body) ? new Date(System.currentTimeMillis()).toString() : "BAD ORDER";
        ByteBuf resp = Unpooled.copiedBuffer(currentTime.getBytes());
        ctx.write(resp);
    }

    @Override
    public void channelReadComplete(ChannelHandlerContext ctx) throws Exception {
        ctx.flush();
    }

    @Override
    public void exceptionCaught(ChannelHandlerContext ctx, Throwable cause) throws Exception {
        ctx.close();
    }
}
客户端操作
客户端操作和服务端基本一致,只需要重点关注channelActive、channelRead、exceptionCaught三个方法。当客户端和服务端建立连接成功后就会调用channelActive方法。当服务端返回消息时,就会调用channelRead方法。
public class TimeClient {
    public void connect(int port, String host) {
        EventLoopGroup group = new NioEventLoopGroup();
        try {
            Bootstrap b = new Bootstrap();
            b.group(group).channel(NioSocketChannel.class)
                    .option(ChannelOption.TCP_NODELAY, true)
                    .handler(new ChannelInitializer<SocketChannel>() {
                        @Override
                        protected void initChannel(SocketChannel ch) throws Exception {
                            ch.pipeline().addLast(new TimeClientHandler());
                        }
                    });

            ChannelFuture f = b.connect(host, port).sync();
            f.channel().closeFuture().sync();
        } catch (InterruptedException e) {
            throw new RuntimeException(e);
        } finally {
            group.shutdownGracefully();
        }
    }

    public static void main(String[] args) {
        int port = 8080;
        new TimeClient().connect(port, "127.0.0.1");
    }
    private static class TimeClientHandler extends ChannelHandlerAdapter {
        private final ByteBuf firstMessage;
        public TimeClientHandler() {
            byte[] req = "QUERY TIME ORDER".getBytes();
            firstMessage = Unpooled.buffer(req.length);
            firstMessage.writeBytes(req);
        }

        @Override
        public void channelActive(ChannelHandlerContext ctx) throws Exception {
            ctx.writeAndFlush(firstMessage);
        }

        @Override
        public void channelRead(ChannelHandlerContext ctx, Object msg) throws Exception {
            ByteBuf buf = (ByteBuf) msg;
            byte[] req = new byte[buf.readableBytes()];
            buf.readBytes(req);
            String body = new String(req, StandardCharsets.UTF_8);
            System.out.println("Now is " + body);
        }

        @Override
        public void exceptionCaught(ChannelHandlerContext ctx, Throwable cause) throws Exception {
            ctx.close();
        }
    }
}
处理TCP粘包
由于TCP是面向字节流的协议,因此数据之间的界限对计算机来说就是模糊不清的,他无法确定哪一部分是一个完整的数据包,典型的例子就是Socket建立的TCP连接需要约定符号来表明一次单向通信的结束。因此需要上层的应用层协议来解决这类问题。
粘包问题产生的原因一般有三个:
- write写入的字节大小大于套接字接口发送缓冲区的大小
- 进行MSS大小的TCP分段
- 以太网帧的payload大于MTU进行IP分片(基于TCP的传输不会发生IP分片)
想要用Netty解决TCP粘包非常简单,只需要在服务端和客户端的管道初始化中添加分隔符和定长解码器就可以了
private static class ChildChannelHandler extends ChannelInitializer<SocketChannel> {

    @Override
    protected void initChannel(SocketChannel socketChannel) throws Exception {
        socketChannel.pipeline().addLast(new LineBasedFrameDecoder(1024));
        socketChannel.pipeline().addLast(new StringDecoder());
        socketChannel.pipeline().addLast(new TimeServerHandler());
    }
}主要的变化就是添加了LineBasedFrameDecoder和StringDecoder。前者会遍历ByteBuf中的可读字节,一旦发现\\n或\\r\\n就会将此位置作为结束位置。如果直到最大长度还没有找到分隔符就会抛出异常并忽略掉之前的异常码流。而后者则是简单的讲读取到的每一行字节转换成字符串。
自定义数据头来包含长度相关的元数据,使用LengthFieldPrepender来在ByteBuf之前添加n个字节的消息长度信息。 LengthFieldBasedFrameDecoder用于处理半包信息,其构造器为
public LengthFieldBasedFrameDecoder(
        int maxFrameLength,
        int lengthFieldOffset, int lengthFieldLength,
        int lengthAdjustment, int initialBytesToStrip) {
    this(
            maxFrameLength,
            lengthFieldOffset, lengthFieldLength, lengthAdjustment,
            initialBytesToStrip, true);
}
第一个参数为最大的帧长度,第二个参数为长度字段的偏移量,第三个参数为长度字段的长度,第四个参数为长度的偏差量,最后的参数表示解码器会舍弃第一个字节到第n-1个字节(截取到body的起始位置)。
Netty编解码
Java本身自带的序列化性能不佳,因此这里使用Messagepack库来实现编解码操作。
要想在Netty引入外部的编解码库需要让对应的编解码器实现MessageToByteEncoder<Object> MessageToMessageDecoder<ByteBuf>
public class MsgpackDecoder extends MessageToMessageDecoder<ByteBuf> {
    @Override
    protected void decode(ChannelHandlerContext ctx, ByteBuf msg, List<Object> out) throws Exception {
        final byte[] array;
        final int length = msg.readableBytes();
        array = new byte[length];
        msg.getBytes(msg.readerIndex(), array, 0, length);
        MessagePack messagePack = new MessagePack();
        out.add(messagePack.read(array));
    }
}
public class MsgpackDecoder extends MessageToMessageDecoder<ByteBuf> {
@Override
protected void decode(ChannelHandlerContext ctx, ByteBuf msg, List<Object> out) throws Exception {
final byte[] array;
final int length = msg.readableBytes();
array = new byte[length];
msg.getBytes(msg.readerIndex(), array, 0, length);
MessagePack messagePack = new MessagePack();
out.add(messagePack.read(array));
}
}使用protobuf实现编解码
首先引入protobuf的依赖并配置protoc插件
<build>
    <plugins>
        <plugin>
            <groupId>org.xolstice.maven.plugins</groupId>
            <artifactId>protobuf-maven-plugin</artifactId>
            <version>0.6.1</version>
            <configuration>
                <protocExecutable>
                    /home/faust/devapps/protobuf/bin/protoc  <!-- 刚刚环境变量配置的位置 -->
                </protocExecutable>
                <pluginId>protoc-java</pluginId>
                <!-- proto文件放置的目录 -->
                <protoSourceRoot>${project.basedir}/proto</protoSourceRoot>
                <!-- 生成文件的目录 -->
                <outputDirectory>${project.basedir}/src/main/java</outputDirectory>
                <!-- 生成文件前是否把目标目录清空,这个最好设置为false,以免误删项目文件 -->
                <clearOutputDirectory>false</clearOutputDirectory>
            </configuration>
            <executions>
                <execution>
                    <goals>
                        <goal>compile</goal>
                    </goals>
                </execution>
            </executions>
        </plugin>
    </plugins>
</build>
由于服务端和客户端的基本处理类似,因此这边只讲解ChannelInitalizer和ChannelHandler两个方面
ProtobufVarint32FrameDecoder主要用于半包处理,随后添加解码器,其中传入的参数告诉解码器目标对象是什么。然后传入长度字段的预处理器和编码器。
protected void initChannel(SocketChannel socketChannel) throws Exception {
    socketChannel.pipeline().addLast(new ProtobufVarint32FrameDecoder());
    socketChannel.pipeline().addLast(new ProtobufDecoder(SubscribeReqProto.SubscribeReq.getDefaultInstance()));
    socketChannel.pipeline().addLast(new ProtobufVarint32LengthFieldPrepender());
    socketChannel.pipeline().addLast(new ProtobufEncoder());
    socketChannel.pipeline().addLast(new SubReqServerHandler());
}
接下来是Handler,由于上面使用了Protobuf解码器,因此收到的msg直接就是自己需要的目标对象。
@ChannelHandler.Sharable
public class SubReqServerHandler extends ChannelHandlerAdapter {
    @Override
    public void channelRead(ChannelHandlerContext ctx, Object msg) throws Exception {
        SubscribeReqProto.SubscribeReq req = (SubscribeReqProto.SubscribeReq) msg;
        ctx.writeAndFlush(resp(req.getSubReqID()));
    }

    private SubscribeRespProto.SubscribeResp resp(int subReqID) {
        SubscribeRespProto.SubscribeResp.Builder builder = SubscribeRespProto.SubscribeResp.newBuilder();
        builder.setSubReqID(subReqID);
        builder.setRespCode(0);
        builder.setDesc("OK");
        return builder.build();
    }

    @Override
    public void exceptionCaught(ChannelHandlerContext ctx, Throwable cause) throws Exception {
        cause.printStackTrace();
        ctx.close();
    }
}
HTTP+XML协议栈实现
首先讲解一下操作的流程
- 构造请求消息,并将消息编码成HTTP+XML格式。由于Netty没有提供将POJO对象转换为HTTP+XML的HTTP请求消息的功能,因此需要我们自己编写编码器。
- 利用Netty的HTTP协议栈,建立HTTP通信链路并发送消息。
- 服务端将消息解码为请求POJO对象,同时获取请求头的信息。由于Netty没有提供对XML格式信息解码的操作,因此需要自己编写解码器
- 服务端构造响应并发还给客户端
- 客户端将应答解码为POJO对象
编写ant脚本进行实体类的编译与绑定
<?xml version="1.0"?>

<!-- ===================================================================

Ant build file for JiBX data binding code to schema starter example.

=================================================================== -->
<project basedir="." default="help">
    <available file="/home/faust/devapps/jibx" property="jibx-home" value="/home/faust/devapps/jibx"/>
    <property environment="env"/>
    <condition property="jibx-home" value="${env.JIBX_HOME}">
        <and>
            <not>
                <isset property="jibx-home"/>
            </not>
            <available file="${env.JIBX_HOME}/lib"/>
        </and>
    </condition>
    <!-- End of jibx-home location setting block. -->

    <!-- make sure required jars are present -->
    <condition property="runtime-jars-found">
        <available file="${jibx-home}/lib/jibx-run.jar"/>
    </condition>
    <condition property="binding-jars-found">
        <and>
            <available file="${jibx-home}/lib/bcel.jar"/>
            <available file="${jibx-home}/lib/jibx-bind.jar"/>
            <available file="${jibx-home}/lib/jibx-run.jar"/>
        </and>
    </condition>
    <available property="extras-jar-found" file="${jibx-home}/lib/jibx-extras.jar"/>

    <!-- set classpath for compiling and running application with JiBX -->
    <path id="classpath">
        <fileset dir="${jibx-home}/lib" includes="*.jar"/>
        <dirset dir="${basedir}/target/classes"/>
    </path>

    <!-- make sure runtime jars are present -->
    <target name="check-runtime">
        <echo message="-------------->${env.JIBX_HOME}"></echo>
        <fail unless="jibx-home">JiBX home directory not found - define JIBX_HOME system property or set path directly in build.xml file.</fail>
        <fail unless="runtime-jars-found">Required JiBX runtime jar jibx-run.jar was not found in JiBX home lib directory (${jibx-home}/lib)</fail>
    </target>

    <!-- make sure extras jars are present -->
    <target name="check-extras" depends="check-runtime">
        <fail unless="extras-jar-found">Required JiBX extras jar jibx-extras.jar was not found in JiBX home lib directory (${jibx-home}/lib)</fail>
    </target>

    <!-- make sure binding jars are present -->
    <target name="check-binding" depends="check-runtime">
        <fail unless="binding-jars-found">Required JiBX binding jar jibx-bind.jar or bcel.jar was not found in JiBX home lib directory (${jibx-home}/lib)</fail>
    </target>

    <!-- clean compiled class files and output file -->
    <target name="clean">
        <delete quiet="true" dir="${basedir}/target/classes/xml/pojo"/>
        <delete quiet="true" file="${basedir}/binding.xml"/>
        <delete quiet="true">
            <fileset dir="${basedir}" includes="out*.xml"/>
            <fileset dir="${basedir}" includes="*.xsd"/>
        </delete>
    </target>

    <!-- compile the classes -->
    <target name="compile" depends="clean,check-runtime">
        <echo message="Compiling Java source code"/>
        <delete quiet="true" dir="${basedir}/target/classes/xml/pojo"/>
        <javac srcdir="${basedir}/src/main/java/xml/pojo" destdir="${basedir}/target/classes" debug="on">
            <classpath refid="classpath"/>
        </javac>
    </target>

    <!-- generate default binding and schema -->
    <target name="bindgen">
        <echo message="Running BindGen tool"/>
        <java classpathref="classpath" fork= "true" failonerror="true" classname="org.jibx.binding.generator.BindGen">
            <arg value="-s"/>
            <arg value="${basedir}/src/main/java/xml/pojo"/>
            <arg value="xml.pojo.Order"/>
        </java>
    </target>

    <!-- bind as a separate step -->
    <target name="bind" depends="check-binding">
        <echo message="Running JiBX binding compiler"/>
        <taskdef name="bind" classname="org.jibx.binding.ant.CompileTask">
            <classpath>
                <fileset dir="${jibx-home}/lib" includes="*.jar"/>
            </classpath>
        </taskdef>
        <bind binding="${basedir}/binding.xml">
            <classpath refid="classpath"/>
        </bind>
    </target>
    <!-- compile, generate default, compile binding, run test -->
    <target name="full" depends="compile,bindgen,bind"/>
    <target name="help">
        <echo message="Targets are:" />
        <echo message="http://sourceforge.net/projects/jibx"/>
    </target>
</project>
在绑定过程中,Jibx会动态修改程序中相应的class文件,生成对象方法的实例和添加被绑定标记的属性。
HTTP请求消息编码的基类,利用jibx将对应的body数据编码为XML格式并封装进ByteBuf
public abstract class AbstractHttpXmlEncoder <T> extends MessageToMessageEncoder<T> {

    private IBindingFactory factory;

    private StringWriter writer;

    private final static Charset UTF_8 = StandardCharsets.UTF_8;

    protected ByteBuf encode0(ChannelHandlerContext ctx, Object body) throws JiBXException, IOException {
        factory = BindingDirectory.getFactory(body.getClass());
        writer = new StringWriter();
        IMarshallingContext mctx = factory.createMarshallingContext();
        mctx.setIndent(2);
        mctx.marshalDocument(body, "utf-8", null, writer);
        String xmlStr = writer.toString();
        writer.close();
        writer = null;
        return Unpooled.copiedBuffer(xmlStr, StandardCharsets.UTF_8);
    }

    @Override
    public void exceptionCaught(ChannelHandlerContext ctx, Throwable cause) throws Exception {
        if (writer != null) {
            writer.close();
            writer = null;
        }
    }
}
HTTP解码的基类,在创建时传入一个class对象,告诉解码器自己解码的目标是谁。
public abstract class AbstractHttpXmlDecoder<T> extends MessageToMessageDecoder<T> {

    private IBindingFactory factory;
    private StringReader reader;
    private Class<?> clazz;
    private boolean isPrint;
    private final static Charset UTF_8 = StandardCharsets.UTF_8;
    private final static String CharsetName = "UTF-8";

    protected AbstractHttpXmlDecoder(Class<?> clazz) {
        this(clazz, false);
    }

    protected AbstractHttpXmlDecoder(Class<?> clazz, boolean isPrint) {
        this.clazz = clazz;
        this.isPrint = isPrint;
    }

    protected Object decode0(ChannelHandlerContext ctx, ByteBuf body) throws JiBXException {
        factory = BindingDirectory.getFactory(clazz);
        String content = body.toString(UTF_8);
        if (isPrint) {
            System.out.println("The body is :" + content);
        }
        reader = new StringReader(content);
        IUnmarshallingContext uctx = factory.createUnmarshallingContext();
        Object result = uctx.unmarshalDocument(reader);
        reader.close();
        reader = null;
        return result;
    }

    @Override
    public void exceptionCaught(ChannelHandlerContext ctx, Throwable cause) throws Exception {
        if (reader != null) {
            reader.close();
            reader = null;
        }
    }
}
接下来就是请求与响应的编解码器实现
请求编码器将HTTP+XML请求转换为HTTP请求,交给Netty传输
public class HttpXmlRequestEncoder extends AbstractHttpXmlEncoder<HttpXmlRequest> {

    @Override
    protected void encode(ChannelHandlerContext ctx, HttpXmlRequest msg, List<Object> out) throws Exception {
        ByteBuf body = encode0(ctx, msg.getBody());
        FullHttpRequest request = msg.getRequest();
        // 如果已经自定义了请求头,不做修改;否则使用默认请求头
        if (request == null) {
            request = new DefaultFullHttpRequest(HttpVersion.HTTP_1_1, HttpMethod.GET, "/do", body);
            HttpHeaders headers = request.headers();
            headers.set(HttpHeaders.Names.HOST, InetAddress.getLocalHost().getHostAddress());
            headers.set(HttpHeaders.Names.CONNECTION, HttpHeaders.Values.CLOSE);
            headers.set(HttpHeaders.Names.ACCEPT_ENCODING, HttpHeaders.Values.GZIP + "," + HttpHeaders.Values.DEFLATE);
            headers.set(HttpHeaders.Names.ACCEPT_CHARSET, "ISO-8859-1,utf-8;q=0.7,*;q=0.7");
            headers.set(HttpHeaders.Names.ACCEPT_LANGUAGE, "zh");
            headers.set(HttpHeaders.Names.USER_AGENT, "Netty xml Http Client side");
            headers.set(HttpHeaders.Names.ACCEPT, "text/html,application/xhtml+xml,application/xml;q=0.9,*/*;q=0.8");
        }
        // 由于请求的消息体不为空也没有使用Chunk方式,因此在消息头中设置消息体的长度
        HttpHeaders.setContentLength(request, body.readableBytes());
        out.add(request);
    }
}
请求解码器则是获得一个HTTP请求,将他按照HTTP+XML的规则解码出来
public class HttpXmlRequestDecoder extends AbstractHttpXmlDecoder<FullHttpRequest> {

    public HttpXmlRequestDecoder(Class<?> clazz) {
        this(clazz, false);
    }

    public HttpXmlRequestDecoder(Class<?> clazz, boolean isPrint) {
        super(clazz, isPrint);
    }

    @Override
    protected void decode(ChannelHandlerContext ctx, FullHttpRequest msg, List<Object> out) throws Exception {
        if (!msg.getDecoderResult().isSuccess()) {
            sendError(ctx, HttpResponseStatus.BAD_REQUEST);
            return;
        }
        HttpXmlRequest request = new HttpXmlRequest(msg, decode0(ctx, msg.content()));
        out.add(request);
    }

    private static void sendError(ChannelHandlerContext ctx, HttpResponseStatus status) {
        FullHttpResponse response = new DefaultFullHttpResponse(HttpVersion.HTTP_1_1, status,
                Unpooled.copiedBuffer("Failure: " + status + "\r\n", CharsetUtil.UTF_8));
        response.headers().set(CONTENT_TYPE, "text/plain; charset=UTF-8");
        ctx.writeAndFlush(response).addListener(ChannelFutureListener.CLOSE);
    }
}
响应解码器是将一个HTTP响应转换为HTTP+XML的格式
public class HttpXmlResponseDecoder extends AbstractHttpXmlDecoder<DefaultFullHttpResponse> {

    public HttpXmlResponseDecoder(Class<?> clazz) {
        this(clazz, false);
    }

    public HttpXmlResponseDecoder(Class<?> clazz, boolean isPrint) {
        super(clazz, isPrint);
    }

    @Override
    protected void decode(ChannelHandlerContext ctx, DefaultFullHttpResponse msg, List<Object> out) throws Exception {
        HttpXmlResponse resp = new HttpXmlResponse(msg, decode0(ctx, msg.content()));
        out.add(resp);
    }
}
响应编码器将HTTP+XML响应按照对应格式编码然后交给Netty的协议栈传输
public class HttpXmlResponseEncoder extends AbstractHttpXmlEncoder<HttpXmlResponse> {
    @Override
    protected void encode(ChannelHandlerContext ctx, HttpXmlResponse msg, List<Object> out) throws Exception {
        ByteBuf body = encode0(ctx,  msg.getResult());
        FullHttpResponse resp = msg.getResponse();
        if (resp == null) {
            resp = new DefaultFullHttpResponse(HttpVersion.HTTP_1_1, HttpResponseStatus.OK, body);
        } else {
            resp = new DefaultFullHttpResponse(msg.getResponse().getProtocolVersion(), msg.getResponse().getStatus(),
                    body);
        }
        resp.headers().set(CONTENT_TYPE, "text/xml");
        setContentLength(resp, body.readableBytes());
        out.add(resp);
    }
}
最后来看看客户端和服务端的实现
public class HttpXmlClient {

    public void connect(int port) throws InterruptedException {
        EventLoopGroup group = new NioEventLoopGroup();
        try {
            Bootstrap b = new Bootstrap();
            b.group(group).channel(NioSocketChannel.class)
                    .option(ChannelOption.TCP_NODELAY, true)
                    .handler(new ChannelInitializer<SocketChannel>() {
                        @Override
                        protected void initChannel(SocketChannel ch) throws Exception {
                            ChannelPipeline pipeline = ch.pipeline();
                            // 将二进制码流转换为响应
                            pipeline.addLast("http-decoder", new HttpResponseDecoder());
                            // 将单个消息的多个部分合并成一条完整的HTTP消息
                            pipeline.addLast("http-aggregator", new HttpObjectAggregator(65536));
                            // 解码为xml响应
                            pipeline.addLast("xml-decoder", new HttpXmlResponseDecoder(Order.class, true));
                            pipeline.addLast("http-encoder", new HttpRequestEncoder());
                            pipeline.addLast("xml-encoder", new HttpXmlRequestEncoder());
                            // tips: 当客户端业务逻辑完成后,会沿着pipeline反向退出去,因此自定义的encoder需要放在后面
                            // 先将消息编码为xmlrequest再交给httpencoder
                            pipeline.addLast("xmlClientHandler", new HttpXmlClientHandler());
                        }
                    });
            ChannelFuture f = b.connect(new InetSocketAddress(port)).sync();
            f.channel().closeFuture().sync();
        } finally {
            group.shutdownGracefully();
        }
    }

    public static void main(String[] args) throws InterruptedException {
        new HttpXmlClient().connect(8080);
    }
}
public class HttpXmlClientHandler extends SimpleChannelInboundHandler<HttpXmlResponse> {
@Override
public void channelActive(ChannelHandlerContext ctx) throws Exception {
HttpXmlRequest request = new HttpXmlRequest(null, OrderFactory.create(123));
ctx.writeAndFlush(request);
}
@Override
protected void messageReceived(ChannelHandlerContext ctx, HttpXmlResponse msg) throws Exception {
System.out.println("The client receive response of http header is :" + msg.getResponse().headers().names());
System.out.println("The client receive response of http body is: " + msg.getResult());
}
}public class HttpXmlServer {
public void run(final int port) throws InterruptedException {
EventLoopGroup bossGroup = new NioEventLoopGroup();
EventLoopGroup workerGroup = new NioEventLoopGroup();
try {
ServerBootstrap b = new ServerBootstrap();
b.group(bossGroup, workerGroup)
.channel(NioServerSocketChannel.class)
.childHandler(new ChannelInitializer<SocketChannel>() {
@Override
protected void initChannel(SocketChannel ch) throws Exception {
ChannelPipeline p = ch.pipeline();
p.addLast("http-decoder", new HttpRequestDecoder());
p.addLast("http-aggregator", new HttpObjectAggregator(65536));
p.addLast("xml-decoder", new HttpXmlRequestDecoder(Order.class, true));
p.addLast("http-encoder", new HttpResponseEncoder());
p.addLast("xml-encoder", new HttpXmlResponseEncoder());
p.addLast("xmlServerHandler", new HttpXmlServerHandler());
}
});
ChannelFuture f = b.bind(new InetSocketAddress(port)).sync();
System.out.println("HTTP订阅服务器启动,网址为:http://localhost:" + port);
f.channel().closeFuture().sync();
} finally {
bossGroup.shutdownGracefully();
workerGroup.shutdownGracefully();
}
}
public static void main(String[] args) throws InterruptedException {
new HttpXmlServer().run(8080);
}
}public class HttpXmlServerHandler extends SimpleChannelInboundHandler<HttpXmlRequest> {
@Override
protected void messageReceived(ChannelHandlerContext ctx, HttpXmlRequest msg) throws Exception {
FullHttpRequest request = msg.getRequest();
Order order = (Order) msg.getBody();
System.out.println("Http server receive request :" + order);
doBusiness(order);
ChannelFuture f = ctx.writeAndFlush(new HttpXmlResponse(null, order));
if (!isKeepAlive(request)) {
f.addListener(future -> ctx.close());
}
}
private void doBusiness(Order order) {
order.getCustomer().setFirstName("狄");
order.getCustomer().setLastName("仁杰");
List<String> midNames = new ArrayList<String>();
midNames.add("李元芳");
order.getCustomer().setMiddleName(midNames);
Address address = order.getBillTo();
address.setCountry("大唐");
address.setState("河南道");
address.setPostCode("123456");
order.setBillTo(address);
order.setShipTo(address);
}
@Override
public void exceptionCaught(ChannelHandlerContext ctx, Throwable cause) throws Exception {
cause.printStackTrace();
if (ctx.channel().isActive()) {
sendError(ctx, INTERNAL_SERVER_ERROR);
}
}
private static void sendError(ChannelHandlerContext ctx,
HttpResponseStatus status) {
FullHttpResponse response = new DefaultFullHttpResponse(HTTP_1_1,
status, Unpooled.copiedBuffer("失败: " + status
+ "\r\n", CharsetUtil.UTF_8));
response.headers().set(CONTENT_TYPE, "text/plain; charset=UTF-8");
ctx.writeAndFlush(response).addListener(ChannelFutureListener.CLOSE);
}
}WebSocket协议开发
HTTP协议的弊端
HTTP协议为半双工协议,在同一时刻只有一个方向上的数据传送
HTTP消息冗长而繁琐,通常情况下采用文本传输,和二进制通信协议相比,冗长而繁琐。
易遭黑客攻击
WebSocket是HTML5开始提供的一种浏览器与服务器间进行全双工通信的网络技术。在WebSocket API中,浏览器和服务器只需要一次握手就可以形成一条快速通道。
因此WebSocket的特点如下:
- 单一的TCP连接,采用全双工模式通信
- 对代理、防火墙和路由器透明
- 无头部信息、Cookie和身份验证
- 无安全开销
- 通过ping/pong帧保持链路激活
- 服务器可以主动传递消息给客户端,不再需要客户端轮询
WebSocket连接建立
客户端首先向服务器发起一个HTTP请求,该请求和通常的HTTP请求不同,他还包含了一些附加头信息
GET /chat HTTP/1.1
HOST: ...
Upgrade: websocket
Connection: Upgrade
Sec-WebSocket-Key: ...
Origin:
Sec-WebSocket-Protocol:
Sec-WebSocket-Version:上面的例子展现了一个客户端发出请求的大致头部格式。其中Upgrade字段表示这是一个申请协议升级的HTTP请求。服务器解析这个头部信息后就将响应返回给客户端,连接就此建立起来。
响应格式大致为:
HTTP/1.1 101 Switching Protocols
Upgrade: websocket
Connection: Upgrade
Sec-WebSocket-Accept: ...
Sec-WebSocket-Protocol: ...Sec-WebSocket-Accept是随机的,服务端会用这些数据构造出一个SHA-1的信息摘要然后加上一个魔幻字符串,接着进行SHA-1加密最后进行BASE-64编码。生成一个Sec-WebSocket-Accept的值。
Netty实现WebSocket服务器
public class WebSocketServer {
    public void run(int port) throws InterruptedException {
        EventLoopGroup bossGroup = new NioEventLoopGroup();
        EventLoopGroup workerGroup = new NioEventLoopGroup();
        try {
            ServerBootstrap b = new ServerBootstrap();
            b.group(bossGroup, workerGroup)
                    .channel(NioServerSocketChannel.class)
                    .childHandler(new ChannelInitializer<SocketChannel>() {
                        @Override
                        protected void initChannel(SocketChannel ch) throws Exception {
                            ChannelPipeline p = ch.pipeline();
                            // 将请求和应答消息编码或解码为HTTP消息
                            p.addLast("http-codec", new HttpServerCodec());
                            p.addLast("aggregator", new HttpObjectAggregator(65536));
                            p.addLast("http-chunked", new ChunkedWriteHandler());
                            p.addLast("handler", new WebSocketServerHandler());
                        }
                    });
            ChannelFuture f = b.bind(port).sync();
            System.out.println("Web Socket server started at localhost:" + port);
            f.channel().closeFuture().sync();
        } finally {
            bossGroup.shutdownGracefully();
            workerGroup.shutdownGracefully();
        }
    }

    public static void main(String[] args) throws InterruptedException {
        new WebSocketServer().run(8080);
    }
}
当接收到一个请求后,处理流程如下:
- 判断请求类型
- 如果是HTTP请求,代表这是一次连接建立请求
- 判断该请求是否要建立WebSocket连接
- 建立握手工厂
- 根据发送来的请求,返回握手响应
- 如果是WebSocket请求,这根据请求类型进行相应的业务处理
@Slf4j
public class WebSocketServerHandler extends SimpleChannelInboundHandler<Object> {

    private WebSocketServerHandshaker serverHandshaker;

    @Override
    protected void messageReceived(ChannelHandlerContext ctx, Object msg) throws Exception {
        // 如果是一次HTTP请求,就代表客户端正在尝试建立连接
        if (msg instanceof FullHttpRequest) {
            handleHttpRequest(ctx, (FullHttpRequest) msg);
        } else if (msg instanceof WebSocketFrame) {
            handleWebSocketFrame(ctx, (WebSocketFrame) msg);
        }
    }

    private void handleWebSocketFrame(ChannelHandlerContext ctx, WebSocketFrame frame) {
        if (frame instanceof CloseWebSocketFrame) {
            serverHandshaker.close(ctx.channel(), ((CloseWebSocketFrame) frame).retain());
            return;
        }
        if (frame instanceof PingWebSocketFrame) {
            ctx.channel().write(new PongWebSocketFrame(frame.content().retain()));
            return;
        }
        if (!(frame instanceof TextWebSocketFrame)) {
            throw new UnsupportedOperationException(String.format("%s frame types not supported", frame.getClass().getName()));
        }
        String request = ((TextWebSocketFrame) frame).text();
        log.info(String.format("%s received %s", ctx.channel(), request));
        ctx.channel().write(new TextWebSocketFrame(request + " 欢迎使用WebSocket 现在是北京时间 " + LocalDateTime.now()));
    }

    private void handleHttpRequest(ChannelHandlerContext ctx, FullHttpRequest req) {
        if (!req.getDecoderResult().isSuccess() || !"websocket".equals(req.headers().get("Upgrade"))) {
            sendHttpResponse(ctx, req, new DefaultFullHttpResponse(HttpVersion.HTTP_1_1, HttpResponseStatus.BAD_REQUEST));
            return;
        }
        // 参数:
        // 1. 用于WebSocket交互的URL,之后的所有请求都会发往这个URL
        // 2. 支持的子协议
        // 3. 是否允许位扩展
        WebSocketServerHandshakerFactory factory =
                new WebSocketServerHandshakerFactory("ws://localhost:8080/websocket", null, false);
        serverHandshaker = factory.newHandshaker(req);
        // 返回握手响应
        if (serverHandshaker == null) {
            WebSocketServerHandshakerFactory.sendUnsupportedWebSocketVersionResponse(ctx.channel());
        } else {
            serverHandshaker.handshake(ctx.channel(), req);
        }
    }

    private void sendHttpResponse(ChannelHandlerContext ctx, FullHttpRequest req, FullHttpResponse resp) {
        if (resp.getStatus().code() != 200) {
            ByteBuf buf = Unpooled.copiedBuffer(resp.getStatus().toString(), StandardCharsets.UTF_8);
            resp.content().writeBytes(buf);
            buf.release();
            setContentLength(resp, resp.content().readableBytes());
        }
        ChannelFuture f = ctx.channel().writeAndFlush(resp);
        if (!isKeepAlive(req) || resp.getStatus().code() != 200) {
            f.addListener(ChannelFutureListener.CLOSE);
        }
    }

    @Override
    public void channelReadComplete(ChannelHandlerContext ctx) throws Exception {
        ctx.flush();
    }

}
服务端创建
步骤:
- 创建ServerBootstrap实例,它提供了一系列方法用于设置服务端启动相关参数。底层利用门面模式对各种能力进行封装
- 设置并构造Reactor线程池,也就是
EventLoopGroup。它的本质就是EventLoop的数组,EventLoop的职责就是处理所有注册到本线程多路复用器的Channel。需要注意的是,EventLoop不光是处理网络IO事件,同时还会处理用户自定义的task和定时任务。这样就实现了一个统一的线程模型。 - 设置并绑定服务端Channel,对用户而言不需要了解服务端Channel的底层实现和工作原理,只需要指定具体使用哪种Channel即可。Netty在底层会通过工厂类,利用反射创建用户传入的Channel对象。
- 链路创建的时候创建并初始化ChannelPipeline,它的本质是一个负责处理网络事件的职责链,负责管理和执行ChannelHandler。典型的网络事件如下:
- 链路注册
- 链路激活
- 链路断开
- 接收到请求消息
- 请求消息接收并处理完毕
- 发送应答消息
- 链路发生异常
- 发生用户自定义事件
- 添加并设置ChannelHandler
- 绑定并启动端口。在绑定监听端口之前系统会进行一系列的初始化和检测工作,完成之后会启动监听端口,并将ServerSocketChannel注册到Selector上监听客户端连接。
- Selector轮询。由Reactor线程负责调度和执行Selector轮询操作,选择准备就绪的Channel集合
- 当轮询到准备就绪的Channel之后,就由Reactor线程执行ChannelPipeline的相应方法,最终调度并执行ChannelHandler
- 执行Netty系统ChannelHandler和用户自定义的ChannelHandler。ChannelPipeline会根据网络事件的类型,调度并执行ChannelHandler
接下根据源码分析一下Netty的服务端创建
private static final class ServerBootstrapChannelFactory<T extends ServerChannel> implements ServerChannelFactory<T> {
      private final Class<? extends T> clazz;

      ServerBootstrapChannelFactory(Class<? extends T> clazz) {
          this.clazz = clazz;
      }

      public T newChannel(EventLoop eventLoop, EventLoopGroup childGroup) {
          try {
              Constructor<? extends T> constructor = this.clazz.getConstructor(EventLoop.class, EventLoopGroup.class);
              return (ServerChannel)constructor.newInstance(eventLoop, childGroup);
          } catch (Throwable var4) {
              throw new ChannelException("Unable to create Channel from class " + this.clazz, var4);
          }
      }

      public String toString() {
          return StringUtil.simpleClassName(this.clazz) + ".class";
      }
}上面是Netty服务端的Channel工厂创建,当调用channel()方法时,bootstrap的内部就会根据传入的class创建一个对应的工厂
在此之后需要设置一些TCP连接的参数,其中最主要的就是backlog这个参数,它指定了内核为此套接字接口安排的最大队列容量,也就是全连接队列+半连接队列的容量总和。
接着用户就可以为启动辅助类和其父类分别指定Handler,两类Handler的用途不同。子类中的Handler是用于连接后的相关业务逻辑,算是工作线程需要的处理器。而父类中的Handler则是负责处理客户端的连接操作
最后就是服务端的绑定操作了,先来大体看一下Netty绑定操作的逻辑。
private ChannelFuture doBind(final SocketAddress localAddress) {
      final ChannelFuture regFuture = this.initAndRegister(); // No.1
      final Channel channel = regFuture.channel();
      if (regFuture.cause() != null) {
          return regFuture;
      } else {
          final Object promise;
          if (regFuture.isDone()) {
              promise = channel.newPromise();
              doBind0(regFuture, channel, localAddress, (ChannelPromise)promise);
          } else {
              promise = new DefaultChannelPromise(channel, GlobalEventExecutor.INSTANCE);
              regFuture.addListener(new ChannelFutureListener() {
                  public void operationComplete(ChannelFuture future) throws Exception {
                      AbstractBootstrap.doBind0(regFuture, channel, localAddress, (ChannelPromise)promise);
                  }
              });
          }

          return (ChannelFuture)promise;
      }
  }
先看No.1标注的一行,进行初始化并注册,它的操作如下
final ChannelFuture initAndRegister() {
      Channel channel;
      try {
          channel = this.createChannel();
      } catch (Throwable var4) {
          return VoidChannel.INSTANCE.newFailedFuture(var4);
      }

      try {
          this.init(channel);
      } catch (Throwable var3) {
          channel.unsafe().closeForcibly();
          return channel.newFailedFuture(var3);
      }

      ChannelPromise regFuture = channel.newPromise();
      channel.unsafe().register(regFuture);
      if (regFuture.cause() != null) {
          if (channel.isRegistered()) {
              channel.close();
          } else {
              channel.unsafe().closeForcibly();
          }
      }

      return regFuture;
  }
第一步是创建Channel,也就是调用之前创建好的Channel工厂类创建一个新的Channel。接着初始化这个Channel。这里看一下他都初始化了一些什么东西:
void init(Channel channel) throws Exception {
        //首先设置一下Socket参数
    Map<ChannelOption<?>, Object> options = this.options();
    synchronized(options) {
        channel.config().setOptions(options);
    }
        // 然后加上NioServerSocketChannel的附加属性
    Map<AttributeKey<?>, Object> attrs = this.attrs();
    synchronized(attrs) {
        Iterator i$ = attrs.entrySet().iterator();

        while(true) {
            if (!i$.hasNext()) {
                break;
            }

            Map.Entry<AttributeKey<?>, Object> e = (Map.Entry)i$.next();
            AttributeKey<Object> key = (AttributeKey)e.getKey();
            channel.attr(key).set(e.getValue());
        }
    }
        // 接着将AbstractBootstrap的Handler(就是调用channel()方法添加的Handler)添加到NioServerSocketChannel的ChannelPipeline当中。
    ChannelPipeline p = channel.pipeline();
    if (this.handler() != null) {
        p.addLast(new ChannelHandler[]{this.handler()});
    }
        // 然后将ChildHandler的相关配置导入
    final ChannelHandler currentChildHandler = this.childHandler;
    final Map.Entry[] currentChildOptions;
    synchronized(this.childOptions) {
        currentChildOptions = (Map.Entry[])this.childOptions.entrySet().toArray(newOptionArray(this.childOptions.size()));
    }

    final Map.Entry[] currentChildAttrs;
    synchronized(this.childAttrs) {
        currentChildAttrs = (Map.Entry[])this.childAttrs.entrySet().toArray(newAttrArray(this.childAttrs.size()));
    }
        // 最后将用于服务端注册的HandlerServerBootstrapAcceptor添加到ChannelPipeline当中,Acceptor的构造器中包含了subReactor需要的处理器
    p.addLast(new ChannelHandler[]{new ChannelInitializer<Channel>() {
        public void initChannel(Channel ch) throws Exception {
            ch.pipeline().addLast(new ChannelHandler[]{new ServerBootstrapAcceptor(currentChildHandler, currentChildOptions, currentChildAttrs)});
        }
    }});
}总的来说,这个方法的初始化与注册包括了创建Channel,初始化Channel的配置,添加Channel中的Handler。梳理一下就是,请求进入服务器,先被mainReactor接收,并经过handler()定义的处理器。然后连接建立完成,自然的进入了Acceptor,Acceptor当中包含了读写操作需要的相关Handler,相当于进入了subReactor。
最后来看一下Channel的注册操作,当Channel初始化完成后就会将它注册到Reactor线程的多路复用器上去。首先会判断是否是NioEventLoop自身发起的操作,如果是就代表不存在并发操作,直接注册。否则将注册操作封装成一个Task放入消息队列异步执行。
public final void register(final ChannelPromise promise) {
      if (AbstractChannel.this.eventLoop.inEventLoop()) {
          this.register0(promise);
      } else {
          try {
              AbstractChannel.this.eventLoop.execute(new Runnable() {
                  public void run() {
                      AbstractUnsafe.this.register0(promise);
                  }
              });
          } catch (Throwable var3) {
              AbstractChannel.logger.warn("Force-closing a channel whose registration task was not accepted by an event loop: {}", AbstractChannel.this, var3);
              this.closeForcibly();
              AbstractChannel.this.closeFuture.setClosed();
              promise.setFailure(var3);
          }
      }

  }

  private void register0(ChannelPromise promise) {
      try {
          if (!this.ensureOpen(promise)) {
              return;
          }

          AbstractChannel.this.doRegister();
          AbstractChannel.this.registered = true;
          promise.setSuccess();
          AbstractChannel.this.pipeline.fireChannelRegistered();
          if (AbstractChannel.this.isActive()) {
              AbstractChannel.this.pipeline.fireChannelActive();
          }
      } catch (Throwable var3) {
          this.closeForcibly();
          AbstractChannel.this.closeFuture.setClosed();
          if (!promise.tryFailure(var3)) {
              AbstractChannel.logger.warn("Tried to fail the registration promise, but it is complete already. Swallowing the cause of the registration failure:", var3);
          }
      }

  }
这一部分是具体的操作,将Channel注册到对应的eventLoop上去,由于不同的Channel有不同的用法,因此这里的注册位设置为0(表示只注册,不监听任何网络操作)。在后续有需要的时候将自己的操作位修改为感兴趣的事件。
protected void doRegister() throws Exception {
    boolean selected = false;

    while(true) {
        try {
            this.selectionKey = this.javaChannel().register(this.eventLoop().selector, 0, this);
            return;
        } catch (CancelledKeyException var3) {
            if (selected) {
                throw var3;
            }

            this.eventLoop().selectNow();
            selected = true;
        }
    }
}
客户端接入
负责处理网络读写、连接和客户端请求接入的Reactor线程是NioEventLoop,当多路复用器检测到新的准备就绪的Channel时,默认执行processSelectedKeysOptimized()方法。
if (selectedKeys != null) {
    processSelectedKeysOptimized(selectedKeys.flip());
} else {
    processSelectedKeysPlain(selector.selectedKeys());
}
下面的代码展示Netty时如何根据不同的操作位选择不同操作的
private static void processSelectedKey(SelectionKey k, AbstractNioChannel ch) {
    final NioUnsafe unsafe = ch.unsafe();
    if (!k.isValid()) {
        // close the channel if the key is not valid anymore
        unsafe.close(unsafe.voidPromise());
        return;
    }

    try {
        int readyOps = k.readyOps();
        // Also check for readOps of 0 to workaround possible JDK bug which may otherwise lead
        // to a spin loop
        if ((readyOps & (SelectionKey.OP_READ | SelectionKey.OP_ACCEPT)) != 0 || readyOps == 0) {
            unsafe.read();
            if (!ch.isOpen()) {
                // Connection already closed - no need to handle write.
                return;
            }
        }
        if ((readyOps & SelectionKey.OP_WRITE) != 0) {
            // Call forceFlush which will also take care of clear the OP_WRITE once there is nothing left to write
            ch.unsafe().forceFlush();
        }
        if ((readyOps & SelectionKey.OP_CONNECT) != 0) {
            // remove OP_CONNECT as otherwise Selector.select(..) will always return without blocking
            // See https://github.com/netty/netty/issues/924
            int ops = k.interestOps();
            ops &= ~SelectionKey.OP_CONNECT;
            k.interestOps(ops);

            unsafe.finishConnect();
        }
    } catch (CancelledKeyException e) {
        unsafe.close(unsafe.voidPromise());
    }
}由于Channel绑定的是NioServerSocketChannel,因此在监听连接操作时,执行的是NioMessageUnsafe中的read方法。它里面会调用doReadMessage方法,接收新的客户端连接并创建NioSocketChannel。
public void read() {
      assert eventLoop().inEventLoop();
      if (!config().isAutoRead()) {
          removeReadOp();
      }

      final ChannelConfig config = config();
      final int maxMessagesPerRead = config.getMaxMessagesPerRead();
      final boolean autoRead = config.isAutoRead();
      final ChannelPipeline pipeline = pipeline();
      boolean closed = false;
      Throwable exception = null;
      try {
          for (;;) {
              int localRead = doReadMessages(readBuf);
              if (localRead == 0) {
                  break;
              }
              if (localRead < 0) {
                  closed = true;
                  break;
              }

              if (readBuf.size() >= maxMessagesPerRead | !autoRead) {
                  break;
              }
          }
      } catch (Throwable t) {
          exception = t;
      }

      int size = readBuf.size();
      for (int i = 0; i < size; i ++) {
          pipeline.fireChannelRead(readBuf.get(i));
      }
      readBuf.clear();
      pipeline.fireChannelReadComplete();

      if (exception != null) {
          if (exception instanceof IOException) {
              // ServerChannel should not be closed even on IOException because it can often continue
              // accepting incoming connections. (e.g. too many open files)
              closed = !(AbstractNioMessageChannel.this instanceof ServerChannel);
          }

          pipeline.fireExceptionCaught(exception);
      }

      if (closed) {
          if (isOpen()) {
              close(voidPromise());
          }
      }
}接收到连接后会触发ChannelPipeline的ChannelRead方法,然后事件就会在职责链中传递,执行ServerBootstrapAcceptor的channelRead方法。
这个方法主要有三个步骤:
- 将启动时传入的childHandler加入到客户端SocketChannel的ChannelPipeline当中
- 设置SocketChannel的TCP参数
- 注册SocketChannel到多路复用器。
客户端创建
客户端创建时序图
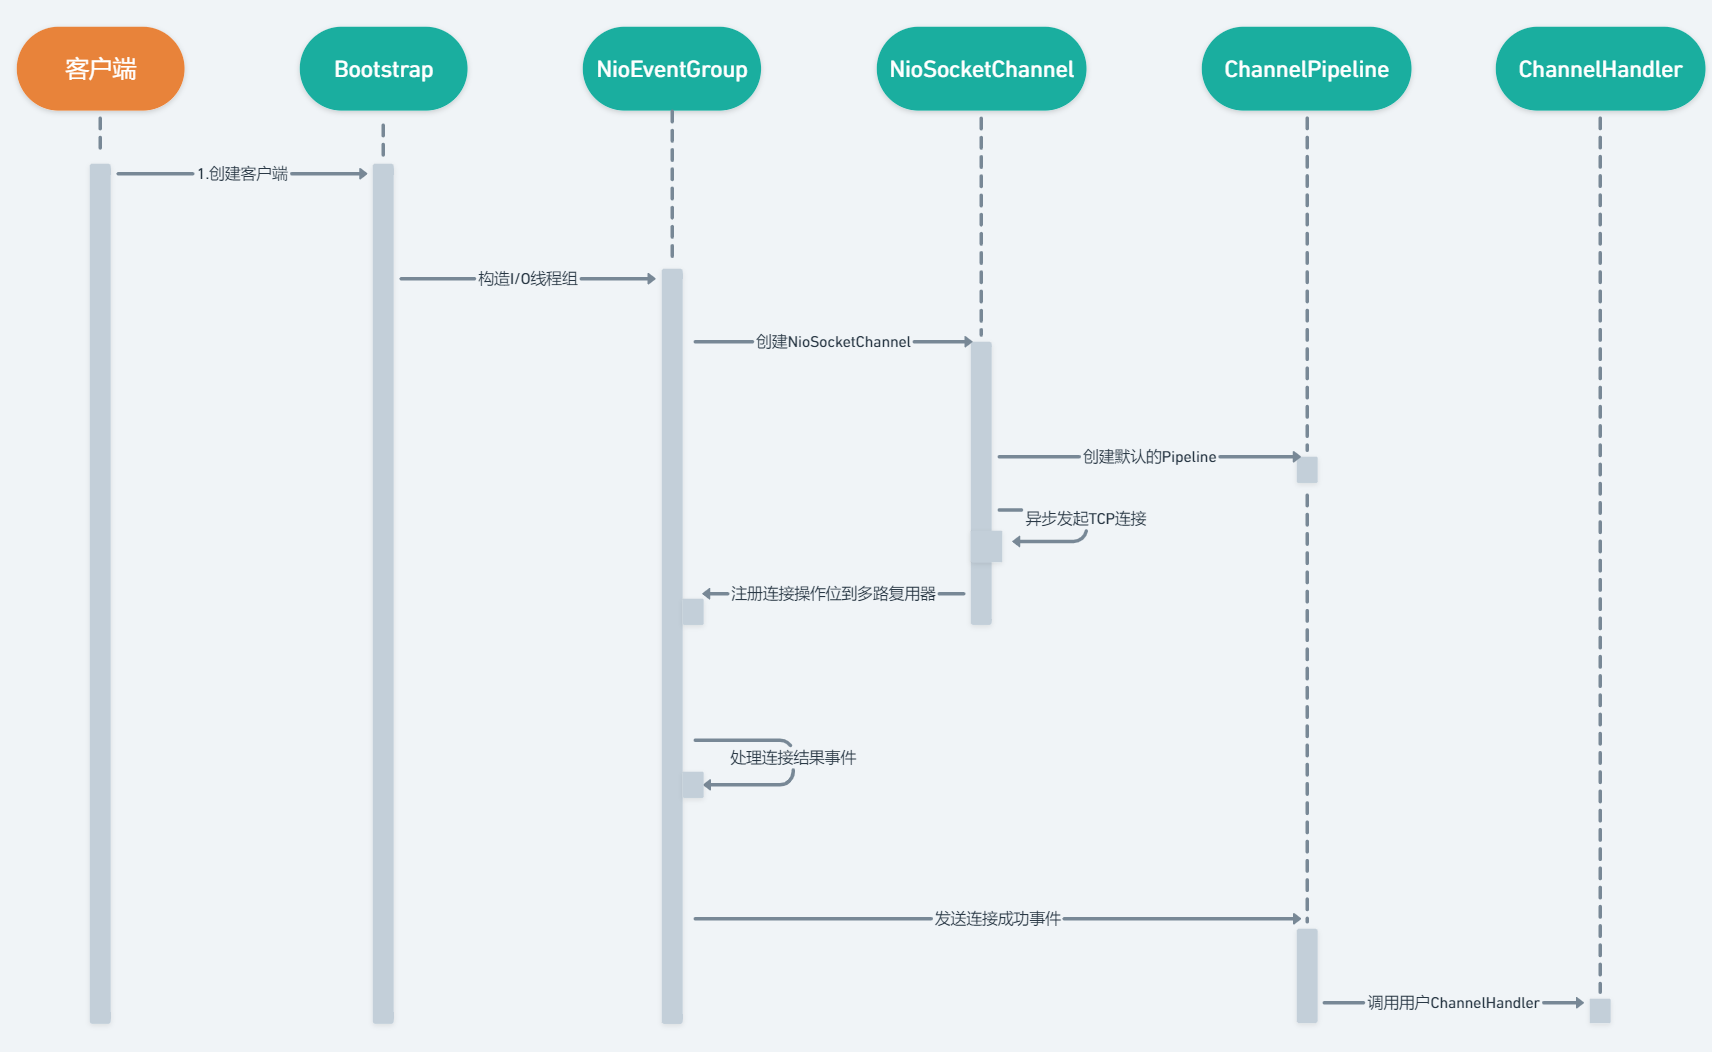
步骤:
- 创建Bootstrap实例,通过API设置客户端相关参数,异步发起客户端连接
- 创建处理客户端连接,I/O读写的Reactor线程组NioEventLoopGroup。可以通过构造函数指定I/O线程的个数,一般为CPU核心数的两倍。
- 通过ChannelFactory和用户指定的Channel创建用于客户端连接的NioSocketChannel。
- 创建默认的Channel Handler Pipeline,用于调度和处理网络事件
- 异步发起TCP连接,判断是否成功。如果成功,就直接讲NioSocketChannel注册到多路复用器上,监听读操作位。如果没有立即连接成功,就注册连接监听器到多路复用器。
- 注册对应的网络监听状态位到多路复用器
- 由多路复用器在I/O线程中轮询Channel,处理连接结果。
- 由ChannelPipeline调度执行系统和用户的ChannelHandler
客户端创建的初始化操作大体与服务端相同,这里讲一下客户端主要的TCP参数:
SO_TIMEOUT:控制读取操作讲阻塞多少毫秒
SO_SENDBUF:套接字使用的发送缓冲区大小
SO_RECVBUF:套接字使用的接收缓冲区大小
SO_REUSEADDR:用于决定如果网络上仍然有向旧ServerSocket传输数据,是否允许新的ServerSocket绑定到与旧的ServerSocket同样的端口上。
CONNECT_TIMEOUT_MILLS:客户端连接超时时间
TCP_NODELAY:决定是否使用
[Nagle](https://www.notion.so/5a82efca437b4c9b981b62b8e67412ae)算法客户端连接
首先还是大致看一下Netty客户端的连接总体操作
private ChannelFuture doConnect(final SocketAddress remoteAddress, final SocketAddress localAddress) {
    final ChannelFuture regFuture = initAndRegister();
    final Channel channel = regFuture.channel();
    if (regFuture.cause() != null) {
        return regFuture;
    }

    final ChannelPromise promise = channel.newPromise();
    if (regFuture.isDone()) {
        doConnect0(regFuture, channel, remoteAddress, localAddress, promise);
    } else {
        regFuture.addListener(new ChannelFutureListener() {
            @Override
            public void operationComplete(ChannelFuture future) throws Exception {
                doConnect0(regFuture, channel, remoteAddress, localAddress, promise);
            }
        });
    }

    return promise;
}
第一步还是初始化并注册Channel,步骤和服务端一样,这里不再赘述。
接下来判断注册是否完成,如果注册完毕,就直接开始尝试连接,否则添加一个监听器,在注册完成之后开始连接。
之后讲重点放到
doConnect0这个方法上private static void doConnect0( final ChannelFuture regFuture, final Channel channel, final SocketAddress remoteAddress, final SocketAddress localAddress, final ChannelPromise promise) { // This method is invoked before channelRegistered() is triggered. Give user handlers a chance to set up // the pipeline in its channelRegistered() implementation. channel.eventLoop().execute(new Runnable() { @Override public void run() { if (regFuture.isSuccess()) { if (localAddress == null) { channel.connect(remoteAddress, promise); } else { channel.connect(remoteAddress, localAddress, promise); } promise.addListener(ChannelFutureListener.CLOSE_ON_FAILURE); } else { promise.setFailure(regFuture.cause()); } } }); }从这里开始,连接操作交给Reactor线程组异步执行,客户端返回。
此后,连接操作最终会调用
HeadHandler的connect方法,他又会调用AbstractNioUnsafe的connect方法。@Override public void connect( final SocketAddress remoteAddress, final SocketAddress localAddress, final ChannelPromise promise) { if (!ensureOpen(promise)) { return; } try { if (connectPromise != null) { throw new IllegalStateException("connection attempt already made"); } boolean wasActive = isActive(); if (doConnect(remoteAddress, localAddress)) { fulfillConnectPromise(promise, wasActive); } else { connectPromise = promise; requestedRemoteAddress = remoteAddress; // Schedule connect timeout. int connectTimeoutMillis = config().getConnectTimeoutMillis(); if (connectTimeoutMillis > 0) { connectTimeoutFuture = eventLoop().schedule(new Runnable() { @Override public void run() { ChannelPromise connectPromise = AbstractNioChannel.this.connectPromise; ConnectTimeoutException cause = new ConnectTimeoutException("connection timed out: " + remoteAddress); if (connectPromise != null && connectPromise.tryFailure(cause)) { close(voidPromise()); } } }, connectTimeoutMillis, TimeUnit.MILLISECONDS); } promise.addListener(new ChannelFutureListener() { @Override public void operationComplete(ChannelFuture future) throws Exception { if (future.isCancelled()) { if (connectTimeoutFuture != null) { connectTimeoutFuture.cancel(false); } connectPromise = null; close(voidPromise()); } } }); } } catch (Throwable t) { if (t instanceof ConnectException) { Throwable newT = new ConnectException(t.getMessage() + ": " + remoteAddress); newT.setStackTrace(t.getStackTrace()); t = newT; } promise.tryFailure(t); closeIfClosed(); } }他先会调用
doConnect方法来尝试连接,这个方法是一个抽象方法,交给子类去实现。NioSocketChannel中的实现如下@Override protected boolean doConnect(SocketAddress remoteAddress, SocketAddress localAddress) throws Exception { if (localAddress != null) { javaChannel().socket().bind(localAddress); } boolean success = false; try { boolean connected = javaChannel().connect(remoteAddress); if (!connected) { selectionKey().interestOps(SelectionKey.OP_CONNECT); } success = true; return connected; } finally { if (!success) { doClose(); } } }如果连接成功就返回true,若暂时没有连接上就将channel注册到CONNECT监听位并返回false。
HeadHandler的connect方法根据doConnect返回的结果采取进一步操作。如果连接成功那么激活channelPipeline
private void fulfillConnectPromise(ChannelPromise promise, boolean wasActive) { // trySuccess() will return false if a user cancelled the connection attempt. boolean promiseSet = promise.trySuccess(); // Regardless if the connection attempt was cancelled, channelActive() event should be triggered, // because what happened is what happened. if (!wasActive && isActive()) { pipeline().fireChannelActive(); } // If a user cancelled the connection attempt, close the channel, which is followed by channelInactive(). if (!promiseSet) { close(voidPromise()); } }否则添加一个定时任务,如果达到了指定时间,还没有连接成功就判定超时,同时添加一个Listener,如果连接成功就取消超时计时器。
Netty源码分析
ByteBuf和相关辅助类
ByteBuf在设计上使用了两个指针,readerIndex和writerIndex。读操作使用readerIndex,写操作使用writerIndex。在读取之后,0-readerIndex被视为discard的,调用discardReadBytes即可释放这部分空间。readerIndex-writerIndex之间的数据是可读取的,writerIndex到capacity之间的空间是可写的。
通过这种设计,ByteBuf极大简化了缓冲区的读写操作。
ByteBuf的动态扩容
Discardable bytes
相比于其他的Java对象,缓冲区的分配和释放是一个非常耗时的操作,因此要尽量重用他们。而缓冲区的动态扩容需要进行字节数组的复制,因此为了最大程度上提升性能,往往需要尽最大努力提升缓冲区的利用率。
@Override public ByteBuf discardReadBytes() { ensureAccessible(); if (readerIndex == 0) { return this; } if (readerIndex != writerIndex) { setBytes(0, this, readerIndex, writerIndex - readerIndex); writerIndex -= readerIndex; adjustMarkers(readerIndex); readerIndex = 0; } else { adjustMarkers(readerIndex); writerIndex = readerIndex = 0; } return this; }上面就是discard操作的具体实现,它会进行字节数组的内存复制。因此频繁使用会导致性能下降
Mark and Reset
当对缓冲区进行读操作时,调用mark操作会将当前位置的指针备份到mark变量当中,调用reset之后会将对应指针的值设为mark中的值。
ByteBuf的分类
从内存分配的角度:
堆内存字节缓冲区:内存的分配和回收速度快,可以被JVM自动回收;缺点是如果进行Socket的I/O读写,需要额外做一个内存复制,将堆内存对应的缓冲区复制到Channel当中,性能会有一定的下降
直接内存字节缓冲区:在堆外进行内存分配,相比于堆内存,他的分配和回收速度会更慢一些,不过他写入或读取Socket Channel中的信息时,速度会更快,因为少了一次内存复制。
一般来说,在I/O通信线程的读写缓冲区使用
DirectByteBuf,后端业务消息的编解码使用HeapByteBuf是最优的。
从内存回收角度:
- 基于对象池的ByteBuf
- 普通ByteBuf
内存池原理分析
为了集中管理内存的分配与释放,同时提高分配和释放时的性能,很多框架和应用都会通过预先申请一大块内存,然后通过提供相应的分配与释放接口来使用内存。这样一来,分配与释放的操作就被集中到了几个类或是几个函数当中,由于不再频繁使用系统调用来申请和释放内存,性能也就大大提高了。
Netty的内存池由多个Chunk组成,每一个Chunk则由一个或多个Page组成。Chunk用来组织和管理多个Page的内存分配与释放。Netty中Chunk的Page被构建成一个二叉树。
假设Page是4个字节,Chunk大小是32个字节,那么Chunk的结构如下图所示
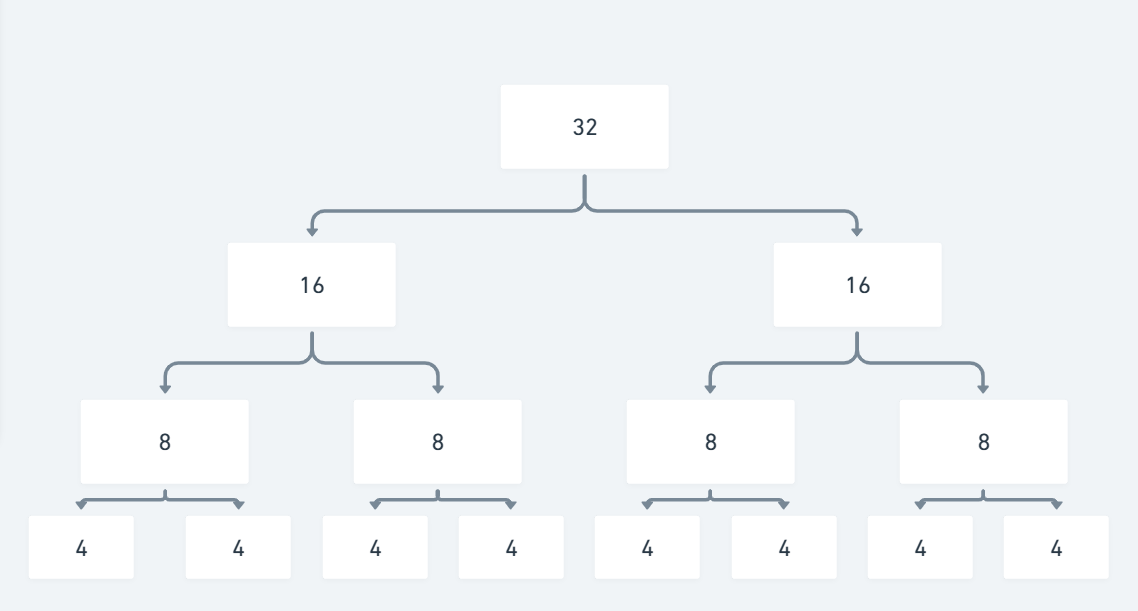
每个节点都记录了自己在整个内存池中的偏移地址,当某个节点的内存被分配出去后,会将该结点标记为已分配。
对于一个小于Page的内存,Netty在Page中完成分配,每个Page会被切分成大小相等的多个存储块。存储块的大小会由第一次申请的内存块大小决定。如果想要更改存储块的大小,那只能使用一个新的Page。
Page中存储区域使用一个long数组来记录存储区域的使用状况。每个元素中的1位用来表示一个存储块的使用情况。
Channel和Unsafe
由于Netty基于事件驱动,因此在进行网络I/O操作时会触发ChannelPipeline中对应事件的方法,然后事件会在pipeline中传输,由对应的ChannelHandler对事件进行拦截和处理。
AbstractNioChannel源码分析
先来看看成员变量:
private static final InternalLogger logger =
InternalLoggerFactory.getInstance(AbstractNioChannel.class);
private final SelectableChannel ch; // 用于设置SelectableChannel参数和进行I/O操作
protected final int readInterestOp; // 代表读操作位
private volatile SelectionKey selectionKey; // Channel注册到线程组后返回的选择键,由于Channel会面对多个业务线程的并发写操作,因此需要使用volatile来保证修改的可见性
private volatile boolean inputShutdown;
/**
* The future of the current connection attempt. If not null, subsequent
* connection attempts will fail.
*/
private ChannelPromise connectPromise; // 连接操作结果
private ScheduledFuture<?> connectTimeoutFuture; // 连接超时定时器
private SocketAddress requestedRemoteAddress;然后来看一下他实现的主要API
首先是注册方法
@Override
protected void doRegister() throws Exception {
boolean selected = false;
for (;;) {
try {
selectionKey = javaChannel().register(eventLoop().selector, 0, this);
return;
} catch (CancelledKeyException e) {
if (!selected) {
// Force the Selector to select now as the "canceled" SelectionKey may still be
// cached and not removed because no Select.select(..) operation was called yet.
eventLoop().selectNow();
selected = true;
} else {
// We forced a select operation on the selector before but the SelectionKey is still cached
// for whatever reason. JDK bug ?
throw e;
}
}
}
}调用SelectableChannel的register方法,将当前的Channel注册到EventLoop的多路复用器上。注册时操作位设置为0,表示对任何事件都不感兴趣。注册时可以指定附件,也就是和selecionKey绑定的对象,之后可以通过这个key从多路复用器里获取绑定的Channel对象。
如果出现了CancelledKeyException就捕获并处理,若是第一次处理该异常,调用selectNow方法将已经取消的key从多路复用器上删除,并标记成功删除,继续发起下一次注册。如果在之后的注册中仍旧收到该异常,表明取消的键无法删除,这个BUG不该发生,抛给上层统一处理。
下面看一下处理读操作之前将网络操作位设置为读操作的代码
@Override
protected void doBeginRead() throws Exception {
if (inputShutdown) {
return;
}
final SelectionKey selectionKey = this.selectionKey;
if (!selectionKey.isValid()) {
return;
}
final int interestOps = selectionKey.interestOps();
if ((interestOps & readInterestOp) == 0) {
selectionKey.interestOps(interestOps | readInterestOp);
}
}首先进行例行检查,然后检查当前操作位是否为读操作,如果不是就将操作位修改为读操作。
AbstractNioByteChannel 源码分析
该类的成员变量只有一个flushTask用来负责继续写半包消息。因此我们将主要目光放在API上。
@Override
protected void doWrite(ChannelOutboundBuffer in) throws Exception {
int writeSpinCount = -1;
for (;;) {
Object msg = in.current(true);
if (msg == null) {
// Wrote all messages.
clearOpWrite();
break;
}来看一下核心方法doWrite(),首先从环形数组ChannelOutboundBuffer中弹出一条消息,判断该消息是否为空,如果为空就代表写入已经完成,清除写操作位。
if (msg instanceof ByteBuf) {
ByteBuf buf = (ByteBuf) msg;
int readableBytes = buf.readableBytes();
if (readableBytes == 0) {
in.remove();
continue;
}
boolean setOpWrite = false;
boolean done = false;
long flushedAmount = 0;
if (writeSpinCount == -1) {
writeSpinCount = config().getWriteSpinCount();
}否则就判断获得到的消息是否为ByteBuf类型,判断它是否还有字节可读,如果没有就直接把它从环形数组中删除并继续读取。
如果缓冲区中有字节可读,就先设置一系列局部变量,写半包表示,消息是否全部发送标识,发送的总消息字节数。接着判断循环发送次数是否为-1,如果是,就从配置对象中获取循环发送次数。
for (int i = writeSpinCount - 1; i >= 0; i --) {
int localFlushedAmount = doWriteBytes(buf);
if (localFlushedAmount == 0) {
setOpWrite = true;
break;
}
flushedAmount += localFlushedAmount;
if (!buf.isReadable()) {
done = true;
break;
}
}接下来就是消息写入操作,调用doWriteBytes将ByteBuf中的数据写入缓冲区。如果写入字节数为0就代表缓冲区已经满了,此时再接着循环很可能仍然发出0字节,因此这时要设置写半包标识并推出循环释放I/O线程
如果发送的字节数大于0,就更新flushedAmount,如果buf已经读取完毕,就设置消息全部发送标识并退出循环。
in.progress(flushedAmount);
if (done) {
in.remove();
} else {
incompleteWrite(setOpWrite);
break;
}最后更新发送进度的方法,如果消息发送完毕,就将它从环形数组中去除,否则调用写半包方法
protected final void incompleteWrite(boolean setOpWrite) {
// Did not write completely.
if (setOpWrite) {
setOpWrite();
} else {
// Schedule flush again later so other tasks can be picked up in the meantime
Runnable flushTask = this.flushTask;
if (flushTask == null) {
flushTask = this.flushTask = new Runnable() {
@Override
public void run() {
flush();
}
};
}
eventLoop().execute(flushTask);
}
}写半包的操作如上,如果设置了写半包标识,那么就将SelectionKey设置为写操作位,这样多路复用器会不断轮询对应的Channel,处理没有发送完成的半包消息。
如果没有设置写操作位,就要启动独立的Runnable将其加入到线程组当中,由Runnable负责半包消息的发送。
AbstractNioMessageChannel源码分析
AbstractNioMessageChannel总体上和AbstractNioByteChannel类似,区别在与一个只能传递ByteBuf和FileRegion,另一个可以传递POJO对象。
MssageChannel在doWrite方法上的实现差距不大,具体过程可以参考ByteChannel
@Override
protected void doWrite(ChannelOutboundBuffer in) throws Exception {
final SelectionKey key = selectionKey();
final int interestOps = key.interestOps();
for (;;) {
Object msg = in.current();
if (msg == null) {
// Wrote all messages.
if ((interestOps & SelectionKey.OP_WRITE) != 0) {
key.interestOps(interestOps & ~SelectionKey.OP_WRITE);
}
break;
}
boolean done = false;
for (int i = config().getWriteSpinCount() - 1; i >= 0; i --) {
if (doWriteMessage(msg, in)) {
done = true;
break;
}
}
if (done) {
in.remove();
} else {
// Did not write all messages.
if ((interestOps & SelectionKey.OP_WRITE) == 0) {
key.interestOps(interestOps | SelectionKey.OP_WRITE);
}
break;
}
}
}AbstractNioMessageServerChannel源码分析
该类的实现非常简单,只是定义了一个 EventLoopGroup用于给新接入的客户端NioSocketChannel分配EventLoop
每当服务端
@Override
protected int doReadMessages(List<Object> buf) throws Exception {
SocketChannel ch = javaChannel.accept();
try {
if (ch != null) {
buf.add(new NioSocketChannel(this, childEventLoopGroup().next(), ch));
return 1;
}
}
}NioServerSocketChannel源码分析
public class NioServerSocketChannel extends AbstractNioMessageServerChannel
implements io.netty.channel.socket.ServerSocketChannel {
private static final ChannelMetadata METADATA = new ChannelMetadata(false);
private static final InternalLogger logger = InternalLoggerFactory.getInstance(NioServerSocketChannel.class);
private static ServerSocketChannel newSocket() {
try {
return ServerSocketChannel.open();
} catch (IOException e) {
throw new ChannelException(
"Failed to open a server socket.", e);
}
}
private final ServerSocketChannelConfig config;首先创建ChannelMetadata成员变量,然后定义ServerSocketChannelConfig用于配置ServerSocketChannel的TCP参数。
newSocket方法用于打开ServerSocketChannel通道
接下来看一下服务端Channel的doReadMessage实现
@Override
protected int doReadMessages(List<Object> buf) throws Exception {
SocketChannel ch = javaChannel().accept();
try {
if (ch != null) {
buf.add(new NioSocketChannel(this, childEventLoopGroup().next(), ch));
return 1;
}
} catch (Throwable t) {
logger.warn("Failed to create a new channel from an accepted socket.", t);
try {
ch.close();
} catch (Throwable t2) {
logger.warn("Failed to close a socket.", t2);
}
}
return 0;
}首先通过ServerSocketChannel的accept接收新的客户端连接,如果SocketChannel不为空,就利用当前的NioServerSocketChannel、EventLoop、SocketChannel创建新的NioSocketChannel,最后返回1,表示服务端消息读取成功
对于NioServerSocketChannl来说,他的工作就是接收客户端的连接
NioSocketChannel源码分析
首先来看连接方法相关的API实现
@Override
protected boolean doConnect(SocketAddress remoteAddress, SocketAddress localAddress) throws Exception {
    if (localAddress != null) {
        javaChannel().socket().bind(localAddress);
    }

    boolean success = false;
    try {
        boolean connected = javaChannel().connect(remoteAddress);
        if (!connected) {
            selectionKey().interestOps(SelectionKey.OP_CONNECT);
        }
        success = true;
        return connected;
    } finally {
        if (!success) {
            doClose();
        }
    }
}首先要判断本地Socket地址是否为空,如果不为空则进行本地地址的绑定。接着尝试与远程地址进行连接,如果没有收到ACK,就将操作位设置为连接操作位,监听连接操作。如果发生了I/O错误,就代表连接建立失败,关闭连接。
接下来看看他的写操作
@Override
protected void doWrite(ChannelOutboundBuffer in) throws Exception {
    for (;;) {
        // Do non-gathering write for a single buffer case.
        final int msgCount = in.size();
        if (msgCount <= 1) {
            super.doWrite(in);
            return;
        }

        // Ensure the pending writes are made of ByteBufs only.
        ByteBuffer[] nioBuffers = in.nioBuffers();
        if (nioBuffers == null) {
            super.doWrite(in);
            return;
}首先获取要发送的消息的个数,如果消息的个数小于等于1,就调用父类AbstractNioByteChannel来进行写操作
在批量发送缓冲区的消息之前,先进行一系列局部变量的赋值
int nioBufferCnt = in.nioBufferCount();
long expectedWrittenBytes = in.nioBufferSize();

final SocketChannel ch = javaChannel();
long writtenBytes = 0;
boolean done = false;
boolean setOpWrite = false;获取需要发送的ByteBuffer数组个数,然后从环形数组中获取需要发送的总字节数,获取对应的SocketChannel,接着定义发送完成标识和写半包标识。
接着在有限的循环内进行发送
for (int i = config().getWriteSpinCount() - 1; i >= 0; i --) {
    final long localWrittenBytes = ch.write(nioBuffers, 0, nioBufferCnt);
    if (localWrittenBytes == 0) {
        setOpWrite = true;
        break;
    }
    expectedWrittenBytes -= localWrittenBytes;
    writtenBytes += localWrittenBytes;
    if (expectedWrittenBytes == 0) {
        done = true;
        break;
    }
}
如果本次发送的字节数为0,代表缓冲区已满,设置写半包标识并退出循环。
每次写入完成之后,更新尚未写入的字节数以及已写入的字节数,如果已经写完,设置完成标识并退出循环。
if (done) {
    // Release all buffers
    for (int i = msgCount; i > 0; i --) {
        in.remove();
    }

    // Finish the write loop if no new messages were flushed by in.remove().
    if (in.isEmpty()) {
        clearOpWrite();
        break;
    }
}
接下来如果写入已经完成,那么就释放掉所有写入的信息,如果没有新的消息进来,那么就清除掉写操作位并退出循环。
else {
    // Did not write all buffers completely.
    // Release the fully written buffers and update the indexes of the partially written buffer.

    for (int i = msgCount; i > 0; i --) {
        final ByteBuf buf = (ByteBuf) in.current();
        final int readerIndex = buf.readerIndex();
        final int readableBytes = buf.writerIndex() - readerIndex;

        if (readableBytes < writtenBytes) {
            in.progress(readableBytes);
            in.remove();
            writtenBytes -= readableBytes;
        } else if (readableBytes > writtenBytes) {
            buf.readerIndex(readerIndex + (int) writtenBytes);
            in.progress(writtenBytes);
            break;
        } else { // readableBytes == writtenBytes
            in.progress(readableBytes);
            in.remove();
            break;
        }
    }

    incompleteWrite(setOpWrite);
    break;
}
如果没有发送完成,就代表出现了写半包的情况,此时需要先将已经写入的消息更新到环形数组里。
先获取消息的读指针以及可读字节,如果可读字节小于已写入的字节数,就代表这个消息已经被完整写入了,如果大于,就代表这个消息没有被完全写入,此时需要更新该消息的读指针,并更新环形数组,最后如果二者相等,就代表这个消息刚好被写完,后面也没有被写入的消息了,清除该消息后就退出循环,开始半包写入。
最后来看一下NioSocketChannel的读取操作
protected int doReadBytes(ByteBuf byteBuf) throws Exception {
    return byteBuf.writeBytes(javaChannel(), byteBuf.writableBytes());
}将字节从channel中写入到传入的ByteBuf里
writeBytes的实现如下
@Override
public int writeBytes(ScatteringByteChannel in, int length) throws IOException {
    ensureWritable(length);
    int writtenBytes = setBytes(writerIndex, in, length);
    if (writtenBytes > 0) {
        writerIndex += writtenBytes;
    }
    return writtenBytes;
}setBytes在UnpooledHeapByteBuf中实现如下
@Override
public int setBytes(int index, ScatteringByteChannel in, int length) throws IOException {
    ensureAccessible();
    try {
        return in.read((ByteBuffer) internalNioBuffer().clear().position(index).limit(index + length));
    } catch (ClosedChannelException e) {
        return -1;
    }
}
ChannelPipeline和ChannelHandler
Netty将数据管道抽象为ChannelPipeline,消息在ChannelPipeline中流动和传递。ChannelPipeline持有I/O事件拦截器ChannelHandler的链表,由ChannelHandler对I/O事件进行拦截和处理。
ChannelPipeline
ChannelPipeline的事件处理

- 底层的SocketChannel read()方法读取ByteBuf,触发ChannelRead事件,由I/O线程NioEventLoop调用ChannelPipeline的fireChannelRead方法,将消息传输到ChannelPipeline中
- 消息依次被HeadHandler、ChannelHandler1、ChannelHandler2、… 、TailHandler拦截和处理。过程中任何Handler都可以中断当前流程结束消息的传递。
- 调用ChannelHandlerContext的write方法发送消息,消息从TailHandler向前传递,最终被添加到消息发送缓冲区当中,等待刷新和发送。
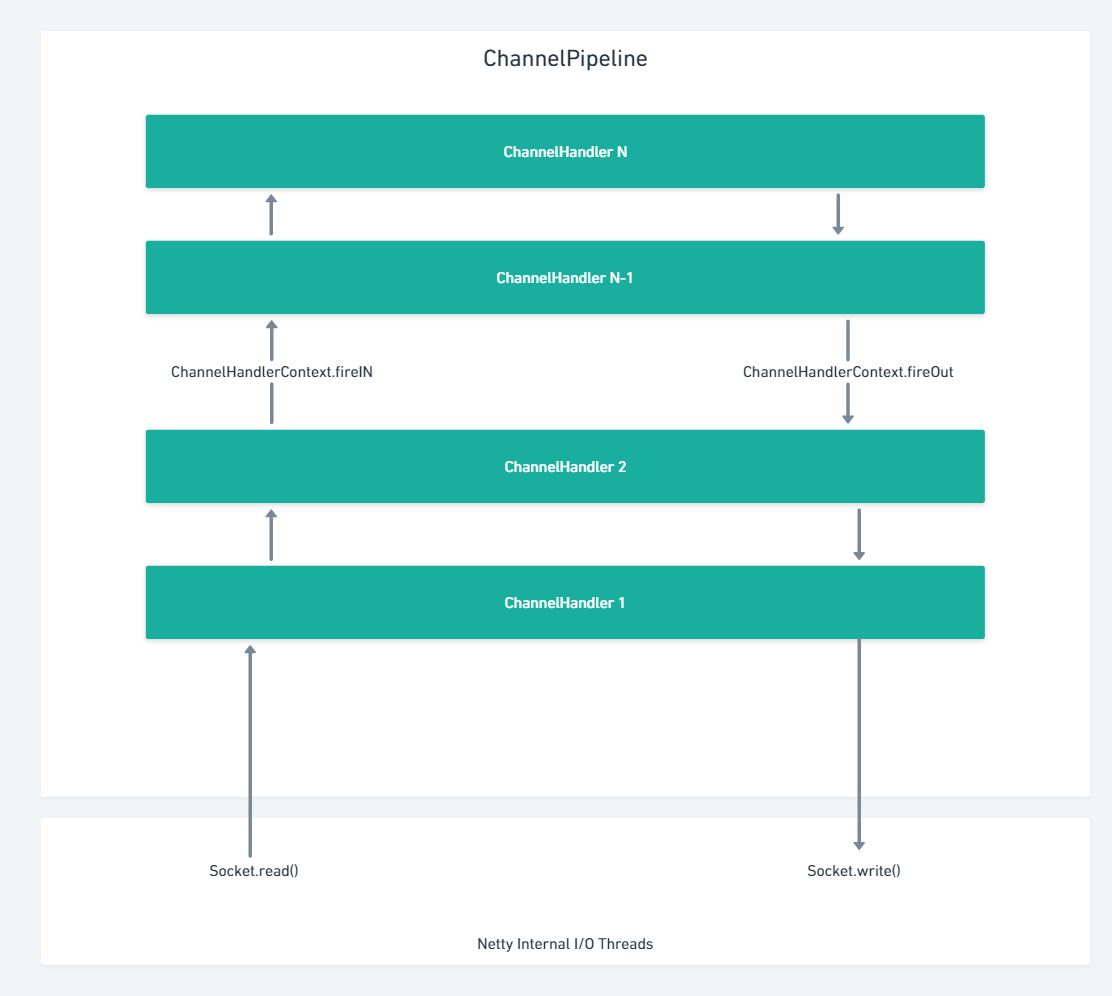
Netty中事件分为两种:
- inbound:由I/O线程触发,例如TCP链路建立事件、关闭事件等等
- outbound:用户主动发起的网络I/O操作
使用ServerBootstrap和Bootstrap启动服务端或客户端时,Netty会为每个Channel连接创建一个独立的pipeline。
ChannelPipeline支持运行态动态添加或者删除ChannelHandler,在某些场景下会非常有用,例如当业务高峰期需要对系统做拥塞保护时,就可以根据当前的系统时间进行判断,若处于高峰期就动态地将系统拥塞保护添加到当前ChannelPipeline当中。
ChannelPipeline是线程安全的,但ChannelHandler不是线程安全的。
接下来看看ChannelPipeline添加ChannelHandler的操作
@Override
public ChannelPipeline addBefore(
        ChannelHandlerInvoker invoker, String baseName, final String name, ChannelHandler handler) {
    synchronized (this) {
        DefaultChannelHandlerContext ctx = getContextOrDie(baseName);

        checkDuplicateName(name);

        DefaultChannelHandlerContext newCtx =
                new DefaultChannelHandlerContext(this, invoker, name, handler);

        addBefore0(name, ctx, newCtx);
    }
    return this;
}
由于ChannelPipeline支持运行期动态修改,因此存在两种潜在的多线程并发场景:
- I/O线程和用户业务线程的并发访问
- 用户多个线程之间的并发访问
因此这里使用了synchronized关键字保证操作的原子性。
这里首先根据baseName获取对应的DefaultChannelHandlerContext,ChannelPipeline维护了ChannelHandler和ChannelHandlerContext实例的映射关系。
接着对新增的ChannelHandler名进行校验,如果没有重复,就创建一个新的context然后将它添加进来
private void addBefore0(final String name, DefaultChannelHandlerContext ctx, DefaultChannelHandlerContext newCtx) {
    checkMultiplicity(newCtx);

    newCtx.prev = ctx.prev;
    newCtx.next = ctx;
    ctx.prev.next = newCtx;
    ctx.prev = newCtx;

    name2ctx.put(name, newCtx);

    callHandlerAdded(newCtx);
}
在添加之前首先需要检查Handler是否允许共享
private static void checkMultiplicity(ChannelHandlerContext ctx) {
    ChannelHandler handler = ctx.handler();
    if (handler instanceof ChannelHandlerAdapter) {
        ChannelHandlerAdapter h = (ChannelHandlerAdapter) handler;
        if (!h.isSharable() && h.added) {
            throw new ChannelPipelineException(
                    h.getClass().getName() +
                    " is not a @Sharable handler, so can't be added or removed multiple times.");
        }
        h.added = true;
    }
}
如果Handler已被添加且没有表明允许共享,就抛出异常,否则标记Handler已被添加。
之后执行添加操作,加入成功后缓存ChannelHandlerContext,发送新增ChannelHandlerContext的通知。
ChannelHandler
ChannelHandler负责对I/O事件或者I/O操作进行拦截和处理
ChannelHandler支持的注解:
@Sharable:多个ChannelPipeline可以共用一个ChannelHandler@Skip:被Skip注解的方法不会被调用
由于大多数ChannelHandler会选择性拦截和处理某些事件,这就导致用户必须去实现那些他们用不到的方法。因此Netty提供了ChannelHandlerAdapter,它里面的所有方法都是透传,方便用户有针对性的实现方法。
这里来分析一下ByteToMessageDecoder源码
首先看channelRead方法
@Override
public void channelRead(ChannelHandlerContext ctx, Object msg) throws Exception {
    if (msg instanceof ByteBuf) {
        RecyclableArrayList out = RecyclableArrayList.newInstance();
        try {
            ByteBuf data = (ByteBuf) msg;
            first = cumulation == null;
            if (first) {
                cumulation = data;
            } else {
                if (cumulation.writerIndex() > cumulation.maxCapacity() - data.readableBytes()) {
                    expandCumulation(ctx, data.readableBytes());
                }
                cumulation.writeBytes(data);
                data.release();
            }
            callDecode(ctx, cumulation, out);
        } catch (DecoderException e) {
            throw e;
        } catch (Throwable t) {
            throw new DecoderException(t);
        } finally {
            if (cumulation != null && !cumulation.isReadable()) {
                cumulation.release();
                cumulation = null;
            }
            int size = out.size();
            decodeWasNull = size == 0;

            for (int i = 0; i < size; i ++) {
                ctx.fireChannelRead(out.get(i));
            }
            out.recycle();
        }
    } else {
        ctx.fireChannelRead(msg);
    }
}
先判断是否是ByteBuf类型的消息,如果不是就将消息传递给下一个Handler。
否则的话就先判断一下当前的消息是否是半包消息,如果是半包消息,那么它会被缓存在cumulation里面。对于没有缓存的消息,直接将它赋值给cumulation然后开始解码。
如果是半包消息,那么首先判断cumulation里面是否还有足够的空间写入,如果没有就进行扩容
private void expandCumulation(ChannelHandlerContext ctx, int readable) {
    ByteBuf oldCumulation = cumulation;
    cumulation = ctx.alloc().buffer(oldCumulation.readableBytes() + readable);
    cumulation.writeBytes(oldCumulation);
    oldCumulation.release();
}
这里的扩容策略只分配恰好够用的缓冲区 (此处的算法可以优化,避免连续半包导致的频繁缓冲区扩张和内存复制)
上面的一系列操作完成之后就开始解码
protected void callDecode(ChannelHandlerContext ctx, ByteBuf in, List<Object> out) {
    try {
        while (in.isReadable()) {
            int outSize = out.size();
            int oldInputLength = in.readableBytes();
            decode(ctx, in, out);

            // Check if this handler was removed before continuing the loop.
            // If it was removed, it is not safe to continue to operate on the buffer.
            //
            // See https://github.com/netty/netty/issues/1664
            if (ctx.isRemoved()) {
                break;
            }

            if (outSize == out.size()) {
                if (oldInputLength == in.readableBytes()) {
                    break;
                } else {
                    continue;
                }
            }

            if (oldInputLength == in.readableBytes()) {
                throw new DecoderException(
                        StringUtil.simpleClassName(getClass()) +
                        ".decode() did not read anything but decoded a message.");
            }

            if (isSingleDecode()) {
                break;
            }
        }
    } catch (DecoderException e) {
        throw e;
    } catch (Throwable cause) {
        throw new DecoderException(cause);
    }
}这里的decode方法交给用户来实现,如果解码完之后out的长度没有变化,说明解码没有成功,这有一下几种可能性:
- 如果用户解码器没有消费ByteBuf,则说明这是一个半包消息,需要由I/O线程继续读取后续的数据报,在这种情况下要退出循环
- 如果用户解码器确实消费了ByteBuf那么说明解码可以继续进行
从上面的代码中我们可以得出一个很重要的契约:如果业务解码器认为当前的字节缓冲区无法完成业务层的解码,需要将readerIndex复位,告诉Netty解码条件不满足。
如果用户解码器没有消费ByteBuf,但解码出了一个或多个对象,这种行为被认为是非法的
最后判断是否是一个单条消息解码器,如果是的话就退出循环
MessageToMessageDecoder负责将一个POJO对象解码成一个POJO对象,下面来看一下他的核心API。
@Override
public void channelRead(ChannelHandlerContext ctx, Object msg) throws Exception {
    RecyclableArrayList out = RecyclableArrayList.newInstance();
    try {
        if (acceptInboundMessage(msg)) {
            @SuppressWarnings("unchecked")
            I cast = (I) msg;
            try {
                decode(ctx, cast, out);
            } finally {
                ReferenceCountUtil.release(cast);
            }
        } else {
            out.add(msg);
        }
    } catch (DecoderException e) {
        throw e;
    } catch (Exception e) {
        throw new DecoderException(e);
    } finally {
        int size = out.size();
        for (int i = 0; i < size; i ++) {
            ctx.fireChannelRead(out.get(i));
        }
        out.recycle();
    }
}首先检查一下传入的msg是否是可接受的类型,如果不是,就直接将它加入到列表里。否认则对他调用decode方法,最后释放被解码的对象。
在所有的处理完成之后,将列表中的所有元素都交给下一个Handler进行处理
LengthFieldBasedFrameDecoder源码分析
基本参数:
- maxFrameLength:最大帧长度
- lengthFieldOffset:长度域偏移
- lengthFieldLength:长度域的长度
- lengthAdjustment:数据长度修正,因为长度域指定的长度可以使header+body的整个长度,也可以只是body的长度。如果表示header+body的整个长度,那么我们需要修正数据长度。
- initialBytesToStrip:跳过的字节数,如果只想接收body,那么需要跳过header占用的字节数
接下来看看核心API:
protected Object decode(ChannelHandlerContext ctx, ByteBuf in) throws Exception {
    if (discardingTooLongFrame) {
        long bytesToDiscard = this.bytesToDiscard;
        int localBytesToDiscard = (int) Math.min(bytesToDiscard, in.readableBytes());
        in.skipBytes(localBytesToDiscard);
        bytesToDiscard -= localBytesToDiscard;
        this.bytesToDiscard = bytesToDiscard;

        failIfNecessary(false);
}判断discardingTooLongFrame标识,看是否需要丢弃当前可读的字节缓冲区,如果为真就执行丢弃操作。由于丢弃的字节数不能超过已读字节数,因此这里只能让ByteBuf跳过丢弃字节数和已读字节数中较小的那个。最后判断是否已经达到了需要丢弃的字节数
private void failIfNecessary(boolean firstDetectionOfTooLongFrame) {
    if (bytesToDiscard == 0) {
        // Reset to the initial state and tell the handlers that
        // the frame was too large.
        long tooLongFrameLength = this.tooLongFrameLength;
        this.tooLongFrameLength = 0;
        discardingTooLongFrame = false;
        if (!failFast ||
            failFast && firstDetectionOfTooLongFrame) {
            fail(tooLongFrameLength);
        }
    } else {
        // Keep discarding and notify handlers if necessary.
        if (failFast && firstDetectionOfTooLongFrame) {
            fail(tooLongFrameLength);
        }
    }
}
接下来判断当前可读字节数是否大于长度偏移量,如果不大于,就代表着无法根据当前的数据读出长度,返回空,等待I/O线程继续读取之后的数据报
if (in.readableBytes() < lengthFieldEndOffset) {
    return null;
}
然后读取数据报中的长度字段
int actualLengthFieldOffset = in.readerIndex() + lengthFieldOffset;
long frameLength = getUnadjustedFrameLength(in, actualLengthFieldOffset, lengthFieldLength, byteOrder);
如果数据报长度<0那么显然是一个不合法的数据报,抛出异常。然后计算经过调整的frameLength,从这里可以看出frameLength的长度就是整包消息的长度。如果最后的frameLength的长度还没有达到长度字段的最终偏移量,那么显然这也不是一个合法的报文长度。
if (frameLength < 0) {
    in.skipBytes(lengthFieldEndOffset);
    throw new CorruptedFrameException(
            "negative pre-adjustment length field: " + frameLength);
}
frameLength += lengthAdjustment + lengthFieldEndOffset;

if (frameLength < lengthFieldEndOffset) {
    in.skipBytes(lengthFieldEndOffset);
    throw new CorruptedFrameException(
            "Adjusted frame length (" + frameLength + ") is less " +
            "than lengthFieldEndOffset: " + lengthFieldEndOffset);
}
如果frameLength大于最大长度,那么就需要丢弃这个消息。如果缓冲区中包含的字节数大于frameLength,那么直接丢弃整包消息。否则就意味着丢弃当前整包消息也无法完成任务,此时将discardingTooLongFrame置位,丢弃当前字节缓冲区的消息,剩下的消息等待下次解码时丢弃。
if (frameLength > maxFrameLength) {
    long discard = frameLength - in.readableBytes();
    tooLongFrameLength = frameLength;

    if (discard < 0) {
        // buffer contains more bytes then the frameLength so we can discard all now
        in.skipBytes((int) frameLength);
    } else {
        // Enter the discard mode and discard everything received so far.
        discardingTooLongFrame = true;
        bytesToDiscard = discard;
        in.skipBytes(in.readableBytes());
    }
    failIfNecessary(true);
    return null;
}
接下来判断可读字节数是否小于frameLength,如果小于,就代表这是个半包消息,返回null
// never overflows because it's less than maxFrameLength
int frameLengthInt = (int) frameLength;
if (in.readableBytes() < frameLengthInt) {
    return null;
}

if (initialBytesToStrip > frameLengthInt) {
    in.skipBytes(frameLengthInt);
    throw new CorruptedFrameException(
            "Adjusted frame length (" + frameLength + ") is less " +
            "than initialBytesToStrip: " + initialBytesToStrip);
}
in.skipBytes(initialBytesToStrip);
最后抽取出frame的消息
// extract frame
int readerIndex = in.readerIndex();
int actualFrameLength = frameLengthInt - initialBytesToStrip;
ByteBuf frame = extractFrame(ctx, in, readerIndex, actualFrameLength);
in.readerIndex(readerIndex + actualFrameLength);
return frame;
NioEventLoop
设计原理:
Netty的NioEventLoop除了负责I/O读写之外,还负责处理:
- 系统Task:通过调用
NioEventLoop的execute方法实现,Netty有很多系统Task,创建他们的主要原因是:当I/O线程和用户线程同时操作网络资源时,为了防止并发操作导致的锁竞争,将用户线程的操作封装成Task放入消息队列当中,由I/O线程负责执行,这样就可以实现局部无锁化。(利用单线程串行执行,避免多线程竞争导致性能下降) - 定时任务:通过调用
NioEventLoop的schedule方法实现
下面先从NioEventLoop初始化Selector开始
private Selector openSelector() {
    final Selector selector;
    try {
        selector = provider.openSelector();
    } catch (IOException e) {
        throw new ChannelException("failed to open a new selector", e);
    }

    if (DISABLE_KEYSET_OPTIMIZATION) {
        return selector;
    }

    try {
        SelectedSelectionKeySet selectedKeySet = new SelectedSelectionKeySet();

        Class<?> selectorImplClass =
                Class.forName("sun.nio.ch.SelectorImpl", false, ClassLoader.getSystemClassLoader());

        // Ensure the current selector implementation is what we can instrument.
        if (!selectorImplClass.isAssignableFrom(selector.getClass())) {
            return selector;
        }

        Field selectedKeysField = selectorImplClass.getDeclaredField("selectedKeys");
        Field publicSelectedKeysField = selectorImplClass.getDeclaredField("publicSelectedKeys");

        selectedKeysField.setAccessible(true);
        publicSelectedKeysField.setAccessible(true);

        selectedKeysField.set(selector, selectedKeySet);
        publicSelectedKeysField.set(selector, selectedKeySet);

        selectedKeys = selectedKeySet;
        logger.trace("Instrumented an optimized java.util.Set into: {}", selector);
    } catch (Throwable t) {
        selectedKeys = null;
        logger.trace("Failed to instrument an optimized java.util.Set into: {}", selector, t);
    }

    return selector;
}
整个过程非常简单,调用JDK NIO提供的API开启Selector,如果用户没有开启SelectedKey的优化就直接返回。如果开启了,那么会利用反射将JDK Selector中的selectedKeys和publicSelectedKeys用Netty实现的版本替换掉。
接下来重点看run方法的实现
@Override
protected void run() {
    for (;;) {
        oldWakenUp = wakenUp.getAndSet(false);
        try {
            if (hasTasks()) {
                selectNow();
            } else {
                select();

                // 'wakenUp.compareAndSet(false, true)' is always evaluated
                // before calling 'selector.wakeup()' to reduce the wake-up
                // overhead. (Selector.wakeup() is an expensive operation.)
                //
                // However, there is a race condition in this approach.
                // The race condition is triggered when 'wakenUp' is set to
                // true too early.
                //
                // 'wakenUp' is set to true too early if:
                // 1) Selector is waken up between 'wakenUp.set(false)' and
                //    'selector.select(...)'. (BAD)
                // 2) Selector is waken up between 'selector.select(...)' and
                //    'if (wakenUp.get()) { ... }'. (OK)
                //
                // In the first case, 'wakenUp' is set to true and the
                // following 'selector.select(...)' will wake up immediately.
                // Until 'wakenUp' is set to false again in the next round,
                // 'wakenUp.compareAndSet(false, true)' will fail, and therefore
                // any attempt to wake up the Selector will fail, too, causing
                // the following 'selector.select(...)' call to block
                // unnecessarily.
                //
                // To fix this problem, we wake up the selector again if wakenUp
                // is true immediately after selector.select(...).
                // It is inefficient in that it wakes up the selector for both
                // the first case (BAD - wake-up required) and the second case
                // (OK - no wake-up required).

                if (wakenUp.get()) {
                    selector.wakeup();
                }
}首先需要将wakeUp还原为false,并将之前的wakeUp状态保存到oldWakeUp变量当中。通过hasTasks判断当前消息队列中是否还有消息没有处理,如果有就立即进行一次select操作。选择完成之后再次判断用户是否调用了wakeup,如果调用就执行selector.wakeup操作
如果消息队列中没有任务要处理,那么就正常调用select方法
private void select() throws IOException {
  Selector selector = this.selector;
  try {
      int selectCnt = 0;
      long currentTimeNanos = System.nanoTime();
      long selectDeadLineNanos = currentTimeNanos + delayNanos(currentTimeNanos);
      for (;;) {
          long timeoutMillis = (selectDeadLineNanos - currentTimeNanos + 500000L) / 1000000L;
          if (timeoutMillis <= 0) {
              if (selectCnt == 0) {
                  selector.selectNow();
                  selectCnt = 1;
              }
              break;
          }

          int selectedKeys = selector.select(timeoutMillis);
          selectCnt ++;

          if (selectedKeys != 0 || oldWakenUp || wakenUp.get() || hasTasks()) {
              // Selected something,
              // waken up by user, or
              // the task queue has a pending task.
              break;
}首先计算一下将要触发的定时任务的超时时间,将它转换为毫秒。对剩余时间进行判断,如果需要立即执行或者已经超时,那么就调用selectNow进行轮询操作,并将selectCnt置为1跳出循环。
Socket操作完成之后,需要对结果进行判断,存在以下情况就跳出循环:
- 有Channel处于就绪状态,selectedKeys不为0,说明有事件要处理
- oldWakeUp为true
- 系统或用户调用了wakeup
- 消息队列中有新的任务需要处理
如果本次轮询结果为空,也没有wakeup操作或是新的消息需要处理,就说明是一个空轮询,有可能触发了epoll bug。
该Bug的修复策略如下:
- 对Selector的select操作周期进行统计
- 每完成一次空的select操作进行一次计数
- 在某个周期内如果连续发生了N次空轮询说明触发了epoll bug
下面是Netty进行的处理:
int selectedKeys = selector.select(timeoutMillis);
selectCnt ++;

if (selectedKeys != 0 || oldWakenUp || wakenUp.get() || hasTasks()) {
    // Selected something,
    // waken up by user, or
    // the task queue has a pending task.
    break;
}

if (SELECTOR_AUTO_REBUILD_THRESHOLD > 0 &&
        selectCnt >= SELECTOR_AUTO_REBUILD_THRESHOLD) {
    // The selector returned prematurely many times in a row.
    // Rebuild the selector to work around the problem.
    logger.warn(
            "Selector.select() returned prematurely {} times in a row; rebuilding selector.",
            selectCnt);

    rebuildSelector();
    selector = this.selector;

    // Select again to populate selectedKeys.
    selector.selectNow();
    selectCnt = 1;
    break;
}
接下来看看rebuildSelector的操作
public void rebuildSelector() {
  if (!inEventLoop()) {
      execute(new Runnable() {
          @Override
          public void run() {
              rebuildSelector();
          }
      });
      return;
  }

  final Selector oldSelector = selector;
  final Selector newSelector;

  if (oldSelector == null) {
      return;
  }

  try {
      newSelector = openSelector();
  } catch (Exception e) {
      logger.warn("Failed to create a new Selector.", e);
      return;
  }
首先判断该操作是不是由其他线程发起的,如果是,那么为了避免多线程并发操作Selector和其他资源,需要将rebuildSelector操作封装成一个Task交给NioEventLoop的消息队列
// Register all channels to the new Selector.
int nChannels = 0;
for (;;) {
    try {
        for (SelectionKey key: oldSelector.keys()) {
            Object a = key.attachment();
            try {
                if (key.channel().keyFor(newSelector) != null) {
                    continue;
                }

                int interestOps = key.interestOps();
                key.cancel();
                key.channel().register(newSelector, interestOps, a);
                nChannels ++;
            } catch (Exception e) {
                logger.warn("Failed to re-register a Channel to the new Selector.", e);
                if (a instanceof AbstractNioChannel) {
                    AbstractNioChannel ch = (AbstractNioChannel) a;
                    ch.unsafe().close(ch.unsafe().voidPromise());
                } else {
                    @SuppressWarnings("unchecked")
                    NioTask<SelectableChannel> task = (NioTask<SelectableChannel>) a;
                    invokeChannelUnregistered(task, key, e);
                }
            }
        }
    } catch (ConcurrentModificationException e) {
        // Probably due to concurrent modification of the key set.
        continue;
    }

    break;
}

selector = newSelector;

try {
    // time to close the old selector as everything else is registered to the new one
    oldSelector.close();
} catch (Throwable t) {
    if (logger.isWarnEnabled()) {
        logger.warn("Failed to close the old Selector.", t);
    }
}

logger.info("Migrated " + nChannels + " channel(s) to the new Selector.");
}
接下来就开始尝试将注册在旧Selector上的key移除并注册到新的Selector中,最后关闭旧的Selector
让我们将目光再度放回run方法上
cancelledKeys = 0;

final long ioStartTime = System.nanoTime();
needsToSelectAgain = false;
if (selectedKeys != null) {
    processSelectedKeysOptimized(selectedKeys.flip());
} else {
    processSelectedKeysPlain(selector.selectedKeys());
}
final long ioTime = System.nanoTime() - ioStartTime;

final int ioRatio = this.ioRatio;
runAllTasks(ioTime * (100 - ioRatio) / ioRatio);

if (isShuttingDown()) {
    closeAll();
    if (confirmShutdown()) {
        break;
    }
}由于没有开启优化,因此会进入processSelectedKeysPlain方法
private void processSelectedKeysPlain(Set<SelectionKey> selectedKeys) {
  // check if the set is empty and if so just return to not create garbage by
  // creating a new Iterator every time even if there is nothing to process.
  // See https://github.com/netty/netty/issues/597
  if (selectedKeys.isEmpty()) {
      return;
  }

  Iterator<SelectionKey> i = selectedKeys.iterator();
  for (;;) {
      final SelectionKey k = i.next();
      final Object a = k.attachment();
      i.remove();

      if (a instanceof AbstractNioChannel) {
          processSelectedKey(k, (AbstractNioChannel) a);
      } else {
          @SuppressWarnings("unchecked")
          NioTask<SelectableChannel> task = (NioTask<SelectableChannel>) a;
          processSelectedKey(k, task);
}迭代获取SelectionKey及其对应的附件,并将key从set中删除避免重复读取。如果附件类型为AbstractNioChannel则交给processSelectedKey处理,否则需要先打包成任务(一般用不到,除非用户自定义)
接下来看看具体的附件处理方法
private static void processSelectedKey(SelectionKey k, AbstractNioChannel ch) {
  final NioUnsafe unsafe = ch.unsafe();
  if (!k.isValid()) {
      // close the channel if the key is not valid anymore
      unsafe.close(unsafe.voidPromise());
      return;
  }
首先还是判断该Key是否有效,如果不可用就直接关闭
接下来根据设定的网络操作位进行不同的操作
try {
  int readyOps = k.readyOps();
  // Also check for readOps of 0 to workaround possible JDK bug which may otherwise lead
  // to a spin loop
  if ((readyOps & (SelectionKey.OP_READ | SelectionKey.OP_ACCEPT)) != 0 || readyOps == 0) {
      unsafe.read();
      if (!ch.isOpen()) {
          // Connection already closed - no need to handle write.
          return;
      }
  }
  if ((readyOps & SelectionKey.OP_WRITE) != 0) {
      // Call forceFlush which will also take care of clear the OP_WRITE once there is nothing left to write
      ch.unsafe().forceFlush();
  }
  if ((readyOps & SelectionKey.OP_CONNECT) != 0) {
      // remove OP_CONNECT as otherwise Selector.select(..) will always return without blocking
      // See https://github.com/netty/netty/issues/924
      int ops = k.interestOps();
      ops &= ~SelectionKey.OP_CONNECT;
      k.interestOps(ops);

      unsafe.finishConnect();
  }
} catch (CancelledKeyException e) {
  unsafe.close(unsafe.voidPromise());
}
Future和Promise
Future
Future在Java中是用来获取异步操作的结果,在JDK中,可以通过get方法获取操作结果,如果操作尚未完成,就会同步阻塞当前调用的线程
因此在原生的JDK中,Future并没有给异步操作带来多大的帮助,因为对用户来说,异步操作的完成时刻是不可知的,而Future的get方法会阻塞调用者。
在Netty中,所有的IO调用都会立刻返回,这就需要让用户了解如何获取异步操作的结果,ChannelFuture就是因此而诞生的。
ChannelFuture有两种状态:uncompleted和completed。当开始一个I/O操作时,一个新的ChannelFuture被创建,此时它处于uncompleted状态。而I/O操作一旦完成,ChannelFuture就会被设置为 completed状态,它的结果有如下可能:
- 操作失败
- 操作成功
- 操作被取消
ChannelFuture采用了异步通知机制来处理结果,用户可以向Future添加Listener,在操作完成后就会调用Listener进行结果的处理。
Promise
Promise是可写的Future,因为Future自身没有写操作相关的接口,Netty通过Promise对Future进行扩展,用于设置I/O操作的结果。
下面来解读一下DefaultPromise中的setSuccess方法
@Override
public Promise<V> setSuccess(V result) {
    if (setSuccess0(result)) {
        notifyListeners();
        return this;
    }
    throw new IllegalStateException("complete already: " + this);
}
private boolean setSuccess0(V result) {
if (isDone()) {
return false;
}
synchronized (this) {
// Allow only once.
if (isDone()) {
return false;
}
if (result == null) {
this.result = SUCCESS;
} else {
this.result = result;
}
if (hasWaiters()) {
notifyAll();
}
}
return true;
}首先判断是否已被设置过,如果已被设置过就直接返回,不允许再次设置。
接下来用同步代码块保护对Promise的操作,二次判断操作结果是否被设置。然后判断操作结果是否为空,如果为空说明只需要notify所有的listener,如果不为空,则需要先将结果设置为result
- 标题: netty
- 作者: Zephyr
- 创建于 : 2023-03-09 14:24:15
- 更新于 : 2023-03-09 14:57:39
- 链接: https://faustpromaxpx.github.io/2023/03/09/netty/
- 版权声明: 本文章采用 CC BY-NC-SA 4.0 进行许可。