外卖商城项目
仿《瑞吉外卖》项目,练手用
外卖项目
功能
title:前台
手机号登录,地址管理,历史订单,菜品规格,
购物车,下单,菜品浏览。
title: 后台
分类管理,菜品管理,套餐管理,菜品口味管理,
员工登录退出,员工管理,订单管理
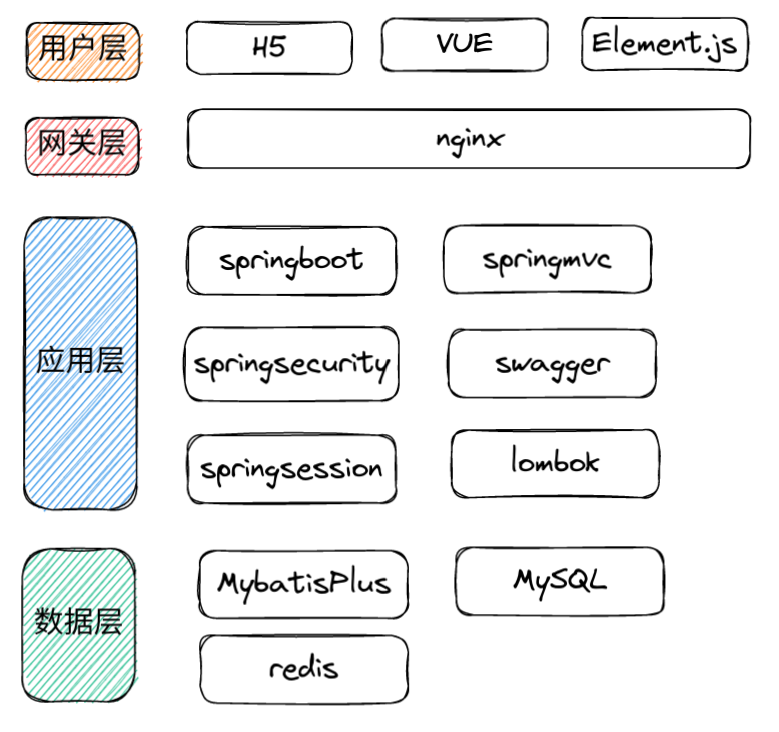
技术选型
角色介绍
- 后台系统管理员:拥有后台系统中的所有操作权限。
- 后台系统普通员工:对菜品,套餐,订单进行管理。
- C端用户:可以浏览菜品,添加购物车,设置地址等。
配置
依赖导入
<?xml version="1.0" encoding="UTF-8"?>
<project xmlns="http://maven.apache.org/POM/4.0.0"
         xmlns:xsi="http://www.w3.org/2001/XMLSchema-instance"
         xsi:schemaLocation="http://maven.apache.org/POM/4.0.0 http://maven.apache.org/xsd/maven-4.0.0.xsd">
    <modelVersion>4.0.0</modelVersion>
    <parent>
        <groupId>org.springframework.boot</groupId>
        <artifactId>spring-boot-starter-parent</artifactId>
        <version>2.7.2</version>
        <relativePath/> <!-- lookup parent from repository -->
    </parent>
    <groupId>com.bei</groupId>
    <artifactId>takeaway-mall</artifactId>
    <version>1.0-SNAPSHOT</version>
    <properties>
        <java.version>11</java.version>
    </properties>
    <dependencies>

        <dependency>
            <groupId>org.springframework.boot</groupId>
            <artifactId>spring-boot-starter</artifactId>
        </dependency>

        <dependency>
            <groupId>org.springframework.boot</groupId>
            <artifactId>spring-boot-starter-test</artifactId>
            <scope>test</scope>
        </dependency>

        <dependency>
            <groupId>org.springframework.boot</groupId>
            <artifactId>spring-boot-starter-web</artifactId>
            <scope>compile</scope>
        </dependency>

        <!-- MyBatis 生成器 -->
        <dependency>
            <groupId>org.mybatis.generator</groupId>
            <artifactId>mybatis-generator-core</artifactId>
            <version>1.3.7</version>
        </dependency>
        <!--MyBatis分页插件-->
        <dependency>
            <groupId>com.github.pagehelper</groupId>
            <artifactId>pagehelper-spring-boot-starter</artifactId>
            <version>1.4.3</version>
        </dependency>

        <!-- lombok -->
        <dependency>
            <groupId>org.projectlombok</groupId>
            <artifactId>lombok</artifactId>
            <version>1.18.20</version>
        </dependency>

        <!-- 序列化工具 -->
        <dependency>
            <groupId>com.alibaba</groupId>
            <artifactId>fastjson</artifactId>
            <version>1.2.78</version>
        </dependency>
        <!-- 通用工具类 -->
        <dependency>
            <groupId>commons-lang</groupId>
            <artifactId>commons-lang</artifactId>
            <version>2.6</version>
        </dependency>
        <!-- 数据库连接 -->
        <dependency>
            <groupId>mysql</groupId>
            <artifactId>mysql-connector-java</artifactId>
            <scope>runtime</scope>
        </dependency>
        <!-- 德鲁伊连接池 -->
        <dependency>
            <groupId>com.alibaba</groupId>
            <artifactId>druid-spring-boot-starter</artifactId>
            <version>1.2.9</version>
        </dependency>

    </dependencies>

    <build>
        <plugins>
            <plugin>
                <groupId>org.springframework.boot</groupId>
                <artifactId>spring-boot-maven-plugin</artifactId>
                <version>2.7.2</version>
            </plugin>
        </plugins>
    </build>

</project>
配置文件
server:
  port: 8080
spring:
  datasource:
    druid:
      driver-class-name: com.mysql.cj.jdbc.Driver
      url: jdbc:mysql://localhost:3307/take-out?serverTimezone=Asia/Shanghai&useUnicode=true&characterEncoding=utf-8&zeroDateTimeBehavior=convertToNull&useSSL=false&allowPublicKeyRetrieval=true
      username: root
      password: 123456

mybatis:
  mapper-locations:
    - classpath:mapper/*.xml
    - classpath*:com/**/mapper/*.xml
对于静态资源,要将其放在static下才能被springboot找到,或者也可以自主添加资源映射。
下面是将请求backend静态资源的路径设置为类路径下的backend文件夹。
public class WebMVCConfig extends WebMvcConfigurationSupport {
    /**
     * 添加静态资源映射
     * */
    @Override
    protected void addResourceHandlers(ResourceHandlerRegistry registry) {
        registry.addResourceHandler("/backend/**").addResourceLocations("classpath:backend/");
        registry.addResourceHandler("/front/**").addResourceLocations("classpath:front/");
    }
}
实体类及对应SQL语句生成
本项目使用mybatis生成器来生成数据库对应的实体类以及SQL语句。
public class Generator {

    public static void main(String[] args) throws IOException, XMLParserException, InvalidConfigurationException, SQLException, InterruptedException {
        List<String> warnings = new ArrayList<>();
        boolean overwrite = true;
        InputStream in = Generator.class.getResourceAsStream("/generatorConfig.xml");
        ConfigurationParser parser = new ConfigurationParser(warnings);
        Configuration configuration = parser.parseConfiguration(in);
        in.close();
        DefaultShellCallback shell = new DefaultShellCallback(overwrite);
        MyBatisGenerator myBatisGenerator = new MyBatisGenerator(configuration, shell, warnings);
        myBatisGenerator.generate(null);
        for (String warning : warnings) {
            System.out.println(warning);
        }
    }
}
/** 为model生成注释 */
public class CommentGenerator extends DefaultCommentGenerator {
private boolean addRemarkComments = false;
private static final String EXAMPLE_SUFFIX="Example";
private static final String MAPPER_SUFFIX="Mapper";
private static final String API_MODEL_PROPERTY_FULL_CLASS_NAME="io.swagger.annotations.ApiModelProperty";
/**
* 设置用户配置的参数
*/
@Override
public void addConfigurationProperties(Properties properties) {
super.addConfigurationProperties(properties);
this.addRemarkComments = StringUtility.isTrue(properties.getProperty("addRemarkComments"));
}
/**
* 给字段添加注释
*/
@Override
public void addFieldComment(Field field, IntrospectedTable introspectedTable,
IntrospectedColumn introspectedColumn) {
String remarks = introspectedColumn.getRemarks();
//根据参数和备注信息判断是否添加swagger注解信息
if(addRemarkComments&&StringUtility.stringHasValue(remarks)){
// addFieldJavaDoc(field, remarks);
//数据库中特殊字符需要转义
if(remarks.contains("\"")){
remarks = remarks.replace("\"","'");
}
//给model的字段添加swagger注解
field.addJavaDocLine("@ApiModelProperty(value = \""+remarks+"\")");
}
}
/**
* 给model的字段添加注释
*/
private void addFieldJavaDoc(Field field, String remarks) {
//文档注释开始
field.addJavaDocLine("/**");
//获取数据库字段的备注信息
String[] remarkLines = remarks.split(System.getProperty("line.separator"));
for(String remarkLine:remarkLines){
field.addJavaDocLine(" * "+remarkLine);
}
addJavadocTag(field, false);
field.addJavaDocLine(" */");
}
@Override
public void addJavaFileComment(CompilationUnit compilationUnit) {
super.addJavaFileComment(compilationUnit);
//只在model中添加swagger注解类的导入
if(!compilationUnit.getType().getFullyQualifiedName().contains(MAPPER_SUFFIX)&&!compilationUnit.getType().getFullyQualifiedName().contains(EXAMPLE_SUFFIX)){
compilationUnit.addImportedType(new FullyQualifiedJavaType(API_MODEL_PROPERTY_FULL_CLASS_NAME));
}
}
}<?xml version="1.0" encoding="UTF-8"?>
<!DOCTYPE generatorConfiguration
PUBLIC "-//mybatis.org//DTD MyBatis Generator Configuration 1.0//EN"
"http://mybatis.org/dtd/mybatis-generator-config_1_0.dtd">
<generatorConfiguration>
<properties resource="generator.properties"/>
<context id="MySqlContext" targetRuntime="MyBatis3" defaultModelType="flat">
<property name="beginningDelimiter" value="`"/>
<property name="endingDelimiter" value="`"/>
<property name="javaFileEncoding" value="UTF-8"/>
<!-- 覆盖mapper的插件 -->
<plugin type="org.mybatis.generator.plugins.UnmergeableXmlMappersPlugin" />
<!-- 为模型生成序列化方法-->
<plugin type="org.mybatis.generator.plugins.SerializablePlugin"/>
<!-- 为生成的Java模型创建一个toString方法 -->
<plugin type="org.mybatis.generator.plugins.ToStringPlugin"/>
<!--可以自定义生成model的代码注释-->
<commentGenerator type="com.bei.mbg.CommentGenerator">
<!-- 是否去除自动生成的注释 true:是 : false:否 -->
<property name="suppressAllComments" value="true"/>
<property name="suppressDate" value="true"/>
<property name="addRemarkComments" value="true"/>
</commentGenerator>
<!--配置数据库连接-->
<jdbcConnection driverClass="${jdbc.driverClass}"
connectionURL="${jdbc.connectionURL}"
userId="${jdbc.userId}"
password="${jdbc.password}">
<!--解决mysql驱动升级到8.0后不生成指定数据库代码的问题-->
<property name="nullCatalogMeansCurrent" value="true" />
</jdbcConnection>
<!--指定生成model的路径-->
<javaModelGenerator targetPackage="com.bei.model" targetProject="src/main/java"/>
<!--指定生成mapper.xml的路径-->
<sqlMapGenerator targetPackage="com.bei.mapper" targetProject="src/main/resources"/>
<!-- 指定生成mapper接口的的路径-->
<javaClientGenerator type="XMLMAPPER" targetPackage="com.bei.mapper"
targetProject="src/main/java"/>
<!--生成全部表tableName设为%-->
<table tableName="%">
<generatedKey column="id" sqlStatement="MySql" identity="true"/>
</table>
</context>
</generatorConfiguration>jdbc.driverClass=com.mysql.cj.jdbc.Driver
jdbc.connectionURL=jdbc:mysql://localhost:3307/take-out?useUnicode=true&characterEncoding=utf-8&serverTimezone=Asia/Shanghai
jdbc.userId=root
jdbc.password=123456通用响应类
提供两个静态方法,可以直接生成成功与失败实例,同时提供动态数据面对要返回复数个对象的情况。
/**
 * 通用响应类
 * */
@Data
public class CommonResult<T> {
    private static final Integer SUCCESS_CODE = 1;
    private static final Integer FAILED_CODE = 0;
    private Integer code; //编码:1成功,0和其它数字为失败

    private String msg; //错误信息

    private T data; //数据

    private Map map = new HashMap(); //动态数据

    public static <T> CommonResult<T> success(T object) {
        CommonResult<T> r = new CommonResult<T>();
        r.data = object;
        r.code = SUCCESS_CODE;
        return r;
    }

    public static <T> CommonResult<T> error(String msg) {
        CommonResult r = new CommonResult();
        r.msg = msg;
        r.code = FAILED_CODE;
        return r;
    }

    public CommonResult<T> add(String key, Object value) {
        this.map.put(key, value);
        return this;
    }
}
登录操作
步骤:
- 检查数据库中是否有该用户,如果没有,返回。
- 检查密码是否正确,如果错误,返回。
- 检查用户当前状态是否可用,如果不可用,返回。
- 登录成功,将用户信息托管给spring security,返回token。
需要依赖:
<!--JWT(Json Web Token)登录支持-->
<dependency>
    <groupId>io.jsonwebtoken</groupId>
    <artifactId>jjwt</artifactId>
    <version>0.9.0</version>
</dependency>
<!-- 解决java不同版本对jwt的兼容问题 -->
<dependency>
    <groupId>javax.xml.bind</groupId>
    <artifactId>jaxb-api</artifactId>
    <version>2.3.0</version>
</dependency>
<!--SpringSecurity依赖配置-->
<dependency>
    <groupId>org.springframework.boot</groupId>
    <artifactId>spring-boot-starter-security</artifactId>
</dependency>
首先对spring security进行配置
由于我们使用jwt,因此可以禁用csrf和session,同时实现框架需要的用户业务类,利用员工service查找对应的员工,由于此处我们只实现登录,因此不需要提取权限。
/** spring security配置类 */
@Configuration
@EnableWebSecurity
@EnableGlobalMethodSecurity(prePostEnabled = true)
public class SecurityConfig extends WebSecurityConfigurerAdapter {

    @Autowired
    private EmployeeService employeeService;

    @Override
    protected void configure(HttpSecurity http) throws Exception {
        // 禁用csrf和session
        http.csrf().disable();
        http.sessionManagement().sessionCreationPolicy(SessionCreationPolicy.STATELESS);
        // 允许网页内嵌显示
		http.headers().frameOptions().sameOrigin();
        http.authorizeRequests()
                .antMatchers("/**")
                .permitAll();
    }

    @Override
    protected void configure(AuthenticationManagerBuilder auth) throws Exception {
        super.configure(auth);
    }

    @Bean
    public UserDetailsService userDetailsService() {
        return username -> {
            Employee employee = employeeService.getEmployeeByUsername(username);
            if (username == null) {
                throw new UsernameNotFoundException("该用户不存在");
            }
            return new AdminUserDetail(employee);
        };
    }
}
接着实现登录的业务逻辑,这里交给框架管理的也仅仅是用户,没有对应的权限。
/**
 * 登录
 * @param username 用户名
 * @param password 密码
 * @return token
 * */public String login(String username, String password) {
    UserDetails userDetails = userDetailsService.loadUserByUsername(username);
    // 校验密码
    if (!passwordEncoder.matches(password, userDetails.getPassword())) {
        throw new BadCredentialsException("密码错误");
    }
    // 将登录成功的用户交给spring security
    UsernamePasswordAuthenticationToken authenticationToken =
            new UsernamePasswordAuthenticationToken(userDetails, null, userDetails.getAuthorities());
    SecurityContextHolder.getContext().setAuthentication(authenticationToken);
    // 返回生成的token
    return jwtTokenUtil.generateToken(userDetails);
}
最后实现控制层接口
@Slf4j
@RestController
@RequestMapping("/employee")
public class EmployeeController {

    @Autowired
    private EmployeeService employeeService;

    @PostMapping("/login")
    public CommonResult login(@RequestBody LoginParam loginParam) {

        String token = employeeService.login(loginParam.getUsername(), loginParam.getPassword());
        if (token == null) {
            return CommonResult.error("用户名或密码错误");
        }
        return CommonResult.success(token);
    }
}
放上jwt的工具类,要注意的是如果token过期,解析token时会直接抛出异常,但是内仍包含解析结果可以辅助我们进行后续处理。这里直接捕获过期异常并返回处理结果。
@Component
public class JwtTokenUtil {
    private static final Logger LOGGER = LoggerFactory.getLogger(JwtTokenUtil.class);
    private static final String CLAIM_KEY_USERNAME = "sub";
    private static final String CLAIM_KEY_CREATED = "created";
    @Value("${jwt.secret}")
    private String secret;
    @Value("${jwt.expiration}")
    private Long expiration;

    private String generateToken(Map<String, Object> claims) {
        return Jwts.builder()
                .setClaims(claims)
                .setExpiration(generateExpirationDate())
                .signWith(SignatureAlgorithm.HS512, secret)
                .compact();
    }

    private Claims getClaimsFromToken(String token) {
        Claims claims = null;
        try {
            claims = Jwts.parser()
                    .setSigningKey(secret)
                    .parseClaimsJws(token)
                    .getBody();
        } catch (ExpiredJwtException e) {
          return e.getClaims();
        } catch (Exception e) {
            LOGGER.info("JWT格式验证失败:{}", token);
        }
        return claims;
    }

    /** token的过期时间 */
    private Date generateExpirationDate() {
        return new Date(System.currentTimeMillis() + expiration * 1000);
    }

    /**
     * 从token获取登录用户名
     * */
    public String getUserNameFromToken(String token) {
        String username;
        try {
            Claims claims = getClaimsFromToken(token);
            username = claims.getSubject();
        } catch (Exception e) {
            username = null;
        }
        return username;
    }

    /** 验证token是否有效 */
    public boolean validateToken(String token, UserDetails userDetails) {
        String username = getUserNameFromToken(token);
        return username.equals(userDetails.getUsername());
    }

    /** 判断token是否已经失效 */
    private boolean isTokenExpired(String token) {
        Date expiredDate = getExpiredDateFromToken(token);
        return expiredDate.before(new Date());
    }

    private Date getExpiredDateFromToken(String token) {
        Claims claims = getClaimsFromToken(token);
        return claims.getExpiration();
    }

    /** 利用用户信息生成token */
    public String generateToken(UserDetails userDetails) {
        Map<String, Object> claims = new HashMap<>();
        claims.put(CLAIM_KEY_USERNAME, userDetails.getUsername());
        claims.put(CLAIM_KEY_CREATED, new Date());
        return generateToken(claims);
    }

    /** 判断token是否可以被刷新 */
    public boolean canRefresh(String token) {
        return !isTokenExpired(token);
    }

    /** 刷新token */
    public String refreshToken(String token) {
        Claims claims = getClaimsFromToken(token);
        claims.put(CLAIM_KEY_CREATED, new Date());
        return generateToken(claims);
    }
}
日志
为方便后续调试,添加一个日志切面,每当收到控制器的请求时,就进行日志记录。
/** 日志切面 */
@Aspect
@Component
@Slf4j
public class LogAspect {

    @Pointcut("execution(public * com.bei.controller..*.*(..))")
    public void logPt() {}

    @Before("logPt()")
    public void doBefore(JoinPoint joinPoint) {
        ServletRequestAttributes attributes = (ServletRequestAttributes) RequestContextHolder.getRequestAttributes();
        HttpServletRequest request = attributes.getRequest();
        log.info("URL: {}", request.getRequestURL().toString());
        log.info("HTTP METHOD: {}", request.getMethod());
        log.info("IP: {}", request.getRemoteAddr());
        log.info("CLASS METHOD: {}", joinPoint.getSignature().getDeclaringTypeName());
        log.info("ARGS: {}", Arrays.toString(joinPoint.getArgs()));
    }
}
过滤器
对于没有登录的用户,需要进行拦截处理。
检测登录状态步骤:
jwt过滤器拦截到请求
如果没有token,直接放行
提取token,检查有没有过期,如果过期就先刷新token
获取其中的用户名。
检测token是否有效,如果有效,放行。如果安全框架未保存用户信息,则进行保存操作。
当将用户信息交给框架时,它会将authenticated设置为true,表示认证成功,保证请求能够进入到控制器。
@Slf4j
public class JwtAuthenticationTokenFilter extends OncePerRequestFilter {

    @Value("${jwt.header}")
    private String header;
    @Value("${jwt.head}")
    private String head;

    @Autowired
    private JwtTokenUtil jwtTokenUtil;

    @Autowired
    private UserDetailsService userDetailsService;

    @Override
    protected void doFilterInternal(HttpServletRequest request, HttpServletResponse response, FilterChain filterChain) throws ServletException, IOException {
        String tokenWithHead = request.getHeader(header);
        if (StringUtils.isNotBlank(tokenWithHead) && tokenWithHead.startsWith(head)) {
            String token = tokenWithHead.substring(head.length());
            // 刷新token
			if (jwtTokenUtil.canRefresh(token)) {
			    jwtTokenUtil.refreshToken(token);
			}
            String username = jwtTokenUtil.getUserNameFromToken(token);
            log.info("start authentication");
            log.info("authorize {}", username);
            log.info("token: {}", token);
            if (username != null && SecurityContextHolder.getContext().getAuthentication() == null) {
                UserDetails userDetails = userDetailsService.loadUserByUsername(username);
                if (jwtTokenUtil.validateToken(token, userDetails)) {
                    UsernamePasswordAuthenticationToken authenticationToken = new UsernamePasswordAuthenticationToken(userDetails, null, userDetails.getAuthorities());
                    authenticationToken.setDetails(new WebAuthenticationDetailsSource().buildDetails(request));
                    SecurityContextHolder.getContext().setAuthentication(authenticationToken);
                    log.info("{} has been authenticated", username);
                }
            }
            log.info("authentication finish");
        }

        filterChain.doFilter(request, response);
    }
}
添加token失效时的自定义返回结果。当认证没有通过时会进入。
/**
 * 登录失败时,自定义返回信息
 * */
@Component
public class RestAuthenticationEntryPoint implements AuthenticationEntryPoint {
    @Override
    public void commence(HttpServletRequest request, HttpServletResponse response, AuthenticationException authException) throws IOException, ServletException {
        response.setCharacterEncoding("UTF-8");
        response.setContentType("application/json");
        response.getWriter().println(JSON.toJSON(CommonResult.error(authException.getMessage())));
        response.getWriter().flush();
    }
}
员工管理
实现功能:修改员工状态(启用,禁用),添加员工,员工信息分页查询,编辑员工信息。
新增员工
步骤:
- 获取当前登录用户
- 设置初始密码,利用雪花算法生成id
- 调用mapper插入数据
@Override
public void addEmployee(EmployeeParam employeeParam, Long uid) {
    Employee employee = new Employee();
    BeanUtils.copyProperties(employeeParam, employee);
    SnowflakeIdUtils idUtils = new SnowflakeIdUtils(uid, 1);
    employee.setId(idUtils.nextId());
    employee.setPassword(passwordEncoder.encode("123456"));
    employee.setCreateTime(new Date());
    employee.setUpdateTime(new Date());
    employee.setCreateUser(uid);
    employee.setUpdateUser(uid);
    employeeMapper.insertSelective(employee);
}
分页查询员工
这里使用mybatis-pageHelper插件实现分页。
分页查询主要参数:页码,每页数据量,姓名。如果传入了姓名参数,就会查询指定姓名的员工并进行分页。
@GetMapping("/page")
public CommonResult getEmployeePage(int page, int pageSize, String name) {
    List<Employee> employeeList = employeeService.getEmployeePage(page, pageSize, name);
    PageInfo<Employee> pageInfo = new PageInfo<>(employeeList);
    return CommonResult.success(pageInfo);
}
public List<Employee> getEmployeePage(int page, int pageSize, String name) {
PageHelper.startPage(page, pageSize);
EmployeeExample example = new EmployeeExample();
if (StringUtils.isNotBlank(name)) {
example.createCriteria().andUsernameEqualTo(name);
}
return employeeMapper.selectByExample(example);
}启用禁用员工
被禁用的员工将不能登录后台系统,该权限只有admin具有。
在本阶段中,我们要添加用户鉴权,以及相应的异常处理。
业务代码实现,这里@PreAuthorize注解表示要想访问这个接口必须具备admin权限。
@PutMapping()
@PreAuthorize("hasAuthority('admin')")
public CommonResult updateEmployeeStatus(Long id, Integer status) {
    int count = employeeService.updateEmployeeStatus(id, status);
    if (count == 1) {
        log.debug("update {} status to {} success", id, status);
        return CommonResult.success("修改用户状态成功");
    } else {
        log.debug("update {} status to {} failed", id, status);
        return CommonResult.error("修改用户状态失败");
    }
}
public int updateEmployeeStatus(Long id, Integer status) {
AdminUserDetail principal = (AdminUserDetail) SecurityContextHolder.getContext().getAuthentication().getPrincipal();
Employee employee = new Employee();
employee.setId(id);
employee.setStatus(status);
employee.setUpdateUser(principal.getId());
employee.setUpdateTime(new Date());
return employeeMapper.updateByPrimaryKeySelective(employee);
}接下来是授权操作,这里我们先简单的给admin赋予权限
@Override
public Collection<? extends GrantedAuthority> getAuthorities() {
    List<GrantedAuthority> authorityList = new ArrayList<>();
    if (employee.getUsername().equals("admin")) {
        authorityList.add(new SimpleGrantedAuthority("admin"));
    }
    return authorityList;
}
最后添加鉴权异常处理
@Component
@Slf4j
public class RestfulAccessDeniedHandler implements AccessDeniedHandler {
    @Override
    public void handle(HttpServletRequest request, HttpServletResponse response, AccessDeniedException accessDeniedException) throws IOException, ServletException {
        response.setContentType("application/json");
        response.setCharacterEncoding("UTF-8");
        response.getWriter().println(JSON.toJSON(CommonResult.error("当前用户权限不足")));
        log.debug("access deny exception: {}", accessDeniedException.getMessage());
        response.getWriter().flush();
    }
}
记录一个小坑
本项目中用户id采用雪花算法生成,最终位数大于16,而js表示数据精度有限,在第17位开始全部为0,导致前后端数据不一致。
解决方法:将id序列化为字符串
@ApiModelProperty(value = "主键")
@JsonSerialize(using = ToStringSerializer.class)
private Long id;
编辑员工信息
- 客户端先向服务器发起请求,获取指定用户当前的信息。
- 用户修改后发起修改请求,完成修改
获取目标用户信息
@GetMapping("/{id}")
public CommonResult getEmployeeInfo(@PathVariable Long id) {
    Employee employee = employeeService.getEmployeeById(id);
    if (employee == null) {
        return CommonResult.error("没有该用户的信息");
    }
    return CommonResult.success(employee);
}
修改用户信息
@PostMapping("/{id}")
@PreAuthorize("hasAuthority('admin')")
public CommonResult updateEmployeeInfo(@PathVariable Long id, @RequestBody EmployeeParam employeeParam) {
    int count = employeeService.updateEmployee(id, employeeParam);
    if (count == 1) {
        log.debug("update id: {} information successfully", id);
        return CommonResult.success("信息更新成功");
    } else {
        log.debug("update id: {} information failed", id);
        return CommonResult.error("信息更新失败");
    }
}
分类管理
功能:新增分类,删除分类,分类信息查询,修改分类。
新增分类
@PostMapping
public CommonResult addCategory(@RequestBody CategoryParam categoryParam) {
    int count = categoryService.addCategory(categoryParam.getName(), categoryParam.getType(), categoryParam.getSort());
    if (count == 1) {
        log.debug("添加分类 " + categoryParam + " 成功");
        return CommonResult.success("添加分类成功");
    }
    log.debug("添加分类 " + categoryParam + " 失败");
    return CommonResult.error("添加分类失败");
}
@Override
public int addCategory(String name, Integer type, Integer sort) {
Category category = new Category();
AdminUserDetail principal = (AdminUserDetail) SecurityContextHolder.getContext().getAuthentication().getPrincipal();
SnowflakeIdUtils snowflakeIdUtils = new SnowflakeIdUtils(principal.getId(), 1);
category.setId(snowflakeIdUtils.nextId());
category.setName(name);
category.setSort(sort);
category.setType(type);
category.setCreateTime(new Date());
category.setUpdateTime(new Date());
category.setCreateUser(principal.getId());
category.setUpdateUser(principal.getId());
return categoryMapper.insert(category);
}删除分类
在删除之前需要检查是否有菜品或套餐还属于该分类,如果有,需要驳回请求。
@DeleteMapping()
public CommonResult deleteCategory(Long id) {
    long dishCount = dishService.getCountByCategory(id);
    long setmealCount = setmealService.getCountByCategory(id);
    if (dishCount > 0 || setmealCount > 0) {
        return CommonResult.error("当前分类下仍有菜品,不可删除");
    }

    int count = categoryService.deleteCategory(id);
    if (count == 1) {
        log.debug("删除分类 [" + id + "] 成功");
        return CommonResult.success("删除成功");
    } else {
        log.debug("删除分类 [" + id + "] 失败");
        return CommonResult.error("删除失败");
    }
}
public int deleteCategory(Long id) {
return categoryMapper.deleteByPrimaryKey(id);
}更新分类
@PutMapping("")
public CommonResult updateCategory(@RequestBody CategoryParam categoryParam) {
    int count = categoryService.updateCategory(categoryParam);
    if (count == 1) {
        log.debug("更新分类 " + categoryParam + " 成功");
        return CommonResult.success("更新成功");
    } else {
        log.debug("更新分类 " + categoryParam + " 失败");
        return CommonResult.success("更新失败");
    }
}
@Override
public int updateCategory(CategoryParam categoryParam) {
AdminUserDetail principal = (AdminUserDetail) SecurityContextHolder.getContext().getAuthentication().getPrincipal();
Category category = new Category();
category.setId(categoryParam.getId());
category.setName(categoryParam.getName());
category.setSort(categoryParam.getSort());
category.setUpdateUser(principal.getId());
category.setUpdateTime(new Date());
return categoryMapper.updateByPrimaryKeySelective(category);
}文件上传和下载
在后面添加菜品时,需要一并上传菜品图片,这里使用七牛云做对象存储。
具体操作直接抄官方文档即可
@Component
@Slf4j
public class QiniuService {

    @Value("${qiniu.accessKey}")
    private String accessKey;

    @Value("${qiniu.secretKey}")
    private String secretKey;

    @Value("${qiniu.bucket}")
    private String bucket;

    @Value("${qiniu.domain}")
    private String domain;

    /**
     * 上传文件
     * @param file 要上传的二进制文件
     * @param filename 文件名
     * @return 在存储空间的文件名
     * */
    public String uploadFile(MultipartFile file, String filename) {

        //构造一个带指定 Region 对象的配置类
        Configuration cfg = new Configuration(Region.autoRegion());
        //...其他参数参考类注释
        UploadManager uploadManager = new UploadManager(cfg);

        //默认不指定key的情况下,以文件内容的hash值作为文件名
        String key = null;
        try {
            byte[] uploadBytes = file.getBytes();
            Auth auth = Auth.create(accessKey, secretKey);
            String upToken = auth.uploadToken(bucket);
            try {
                Response response = uploadManager.put(uploadBytes, filename, upToken);
                //解析上传成功的结果
                DefaultPutRet putRet = JSON.parseObject(response.bodyString(), DefaultPutRet.class);
                return putRet.key;
            } catch (QiniuException ex) {
                Response r = ex.response;
                log.error(r.toString());
                try {
                    log.error(r.bodyString());
                } catch (QiniuException ex2) {
                    //ignore
                }
            }
        } catch (IOException ex) {
            //ignore
        }
        return "";
    }

    /**
     * 下载文件
     * @param filename 文件名
     * @return 文件url
     * */    public String download(String filename) throws UnsupportedEncodingException {
        String encodedFileName = URLEncoder.encode(filename, "utf-8").replace("+", "%20");
        String finalUrl = String.format("%s/%s", domain, encodedFileName);
        return "http://" + finalUrl;
    }
}
在上传时,文件名需要使用UUID另外生成,避免用户上传同名文件导致覆盖。
@RequestMapping("/common")
@RestController
public class CommonController {

    @Autowired
    private QiniuService qiniuService;

    @PostMapping("/upload")
    public CommonResult uploadFile(MultipartFile file) {
        String suffix = file.getOriginalFilename().substring(file.getOriginalFilename().lastIndexOf("."));
        String filename = UUID.randomUUID() + suffix;
        String name = qiniuService.uploadFile(file, filename);
        return CommonResult.success(name);
    }

    @GetMapping("/download")
    public CommonResult download(String name, HttpServletResponse response) {
        try {
            String picUrl = qiniuService.download(name);
            URL url = new URL(picUrl);
            HttpURLConnection urlConnection = (HttpURLConnection) url.openConnection();
            urlConnection.setConnectTimeout(1000*5);
            urlConnection.connect();
            InputStream in = new BufferedInputStream(urlConnection.getInputStream());
            OutputStream out = response.getOutputStream();
            byte[] buf = new byte[1024];
            int size;
            while ((size = in.read(buf)) != -1) {
                out.write(buf, 0, size);
            }
            in.close();
            out.close();
        } catch (UnsupportedEncodingException e) {
            return CommonResult.error("文件格式错误");
        } catch (MalformedURLException e) {
            return CommonResult.error("url获取错误");
        } catch (IOException e) {
            return CommonResult.error("文件读取错误");
        }
        return CommonResult.success("传输成功");
    }
}
菜品管理
新增菜品
前端传入的参数分为两个部分,一部分属于dish,另一部分属于dishFlavor(菜品口味)。因此单一的dish不足以容纳参数,可以新建一个dto存储。这里种类id也要做串行化处理,否则它在前端会丢失精度导致无法与对应的id匹配。
@Data
public class DishDto {

    @JsonSerialize(using = ToStringSerializer.class)
    private Long id;

    private String name;

    @JsonSerialize(using = ToStringSerializer.class)
    private Long categoryId;

    private BigDecimal price;

    private String code;

    private String image;

    private String description;

    private Integer status;

    private List<DishFlavor> flavors;
}
控制层处理逻辑,将dish和口味分别交给对应的服务层处理。注意需要启动事务。
@PostMapping("")
@Transactional
public CommonResult addDish(@RequestBody DishDto dishParam) {
    Dish dish = new Dish();
    BeanUtils.copyProperties(dishParam, dish);
    Long dishId = dishService.addDish(dish);
    dishFlavorService.addDishFlavorBatch(dishParam.getFlavors(), dishId);
    return CommonResult.success(dishId);
}
dish的插入很简单,没什么好说的。这里简单说一下口味的插入。由于传入的口味是列表形式,因此不可避免的会想到使用循环,但在宿主语言直接使用循环插入效率极低。这里采用mybatis的原生批量插入方式。
<insert id="insertBatch">
  insert into dish_flavor (id, dish_id, name, value,   create_time, update_time, create_user,   update_user, is_deleted)
   values
   <foreach collection="dishFlavorList" item="dishFlavor" separator=",">
    (#{dishFlavor.id}, #{dishFlavor.dishId,jdbcType=BIGINT}, #{dishFlavor.name,jdbcType=VARCHAR}, #{dishFlavor.value,jdbcType=VARCHAR},    #{dishFlavor.createTime,jdbcType=TIMESTAMP}, #{dishFlavor.updateTime,jdbcType=TIMESTAMP}, #{dishFlavor.createUser,jdbcType=BIGINT},    #{dishFlavor.updateUser,jdbcType=BIGINT}, #{dishFlavor.isDeleted,jdbcType=INTEGER})
    </foreach>
</insert>
不过这种方式有个缺陷是会导致sql语句的长度剧烈增长,一旦文件大小超过4M就会插入失败,不过本项目不考虑海量数据的情况。如果既想高效又要保证足够的健壮性可以使用MP自带的批量插入。
service层操作
@Override
public void addDishFlavorBatch(List<DishFlavor> dishFlavorList, Long dishId) {
    SnowflakeIdUtils snowflakeIdUtils = new SnowflakeIdUtils(4, 1);
    AdminUserDetail principal = (AdminUserDetail) SecurityContextHolder.getContext().getAuthentication().getPrincipal();
    Long uid = principal.getId();
    dishFlavorList = dishFlavorList.stream()
            .peek(dishFlavor -> {
                dishFlavor.setId(snowflakeIdUtils.nextId());
                dishFlavor.setDishId(dishId);
                dishFlavor.setCreateTime(new Date());
                dishFlavor.setUpdateTime(new Date());
                dishFlavor.setUpdateUser(uid);
                dishFlavor.setCreateUser(uid);
                dishFlavor.setIsDeleted(1);
            }).collect(Collectors.toList());
    dishFlavorMapper.insertBatch(dishFlavorList);
}
菜品信息分页查询
首先要注意这里需要菜品分类的名称而非id,因此可以创建一个vo用于用户层展示。这里注意要把id也返回过去,不然之后前端拿不到数据来完成更新时需要的数据查询。
@Data
public class DishVo {

    @JsonSerialize(using = ToStringSerializer.class)
    private Long id;

    private String name;

    private String categoryName;

    private BigDecimal price;

    private String code;

    private String image;

    private String description;

    private Integer status;

    private String updateTime;

    private List<DishFlavor> flavors;
}控制层的逻辑。由于pageHelper只会对下一次sql操作进行分页,如果该sql返回的list在送入pageInfo前被作出改动则分页会失效。因此这里的处理是先将返回的list放入pageinfo,然后再作出修改,放回pageinfo。
这里如果使用联表查询,也可以避免上面提到的问题,不过本项目本着尽量简单的宗旨,就先凑合着用吧。
@GetMapping("/page")
public CommonResult getDishPage(int page, int pageSize, String name) {
    List<Dish> dishList = dishService.getDishPage(page, pageSize, name);
    SimpleDateFormat dateFormat = new SimpleDateFormat("yyyy:MM:dd");
    PageInfo pageInfo = new PageInfo(dishList);
    List list = (List) pageInfo.getList().stream()
            .map(o -> {
                Dish dish = (Dish) o;
                DishVo dishVo = new DishVo();
                BeanUtils.copyProperties(dish, dishVo);
                Category category = categoryService.getCategoryById(dish.getCategoryId());
                dishVo.setUpdateTime(dateFormat.format(dish.getUpdateTime()));
                dishVo.setCategoryName(category.getName());
                return dishVo;
            })
            .collect(Collectors.toList());
    pageInfo.setList(list);
    return CommonResult.success(pageInfo);
}
更新菜品信息
首先需要回显原先的菜品信息,由于之前传入是用的dto,因此这里传回前端也可以使用dto
@GetMapping("/{id}")
public CommonResult getDishDetail(@PathVariable Long id) {
    Dish dish = dishService.getDishById(id);
    if (dish == null) {
        return CommonResult.error("没有该菜品的信息");
    }
    List<DishFlavor> flavors = dishFlavorService.getFlavorByDish(id);
    DishDto dishDto = new DishDto();
    BeanUtils.copyProperties(dish, dishDto);
    dishDto.setFlavors(flavors);
    return CommonResult.success(dishDto);
}
随后是更新菜品,同样本着尽量不动脑的宗旨,这里对于口味的处理是先全部删除,然后重新插入
@PutMapping
@Transactional
public CommonResult updateDish(@RequestBody DishDto dishDto) {
    Dish dish = new Dish();
    BeanUtils.copyProperties(dishDto, dish);
    int count = dishService.updateDish(dish);
    if (count != 1) {
        log.debug("更新菜品 [" + dishDto + "] 失败");
        return CommonResult.error( "更新菜品失败");
    }
    dishFlavorService.removeByDish(dish.getId());
    dishFlavorService.addDishFlavorBatch(dishDto.getFlavors(), dish.getId());
    return CommonResult.success(dish.getId());
}
更新菜品状态
修改菜品的status字段
停售菜品后对应套餐的可选操作:
- 直接将套餐停售,但是这里这么做的话会让控制层耦合度过高
- 用户查询套餐详细信息时显示提示,下单时直接拒绝
@PostMapping("/status/0")
public CommonResult disableDish(String ids) {
    List<Long> idList = convertIdsToList(ids);
    for (Long id : idList) {
        Dish dish = new Dish();
        dish.setId(id);
        dish.setStatus(0);
        int count = dishService.updateDish(dish);
        if (count != 1) {
            log.debug("停售 " + id + " 失败,数据库没有找到操作对象");
            throw new BusinessException("停售失败,请检查参数是否正确");
        }
    }
    return CommonResult.success("停售成功");
}

@PostMapping("/status/1")
public CommonResult enableDish(String ids) {
    List<Long> idList = convertIdsToList(ids);
    for (Long id : idList) {
        Dish dish = new Dish();
        dish.setId(id);
        dish.setStatus(1);
        int count = dishService.updateDish(dish);
        if (count != 1) {
            log.debug("启售 " + ids + " 失败,数据库没有找到操作对象");
            throw new BusinessException("启售失败,请检查参数是否正确");
        }
    }
    return CommonResult.success("启售成功");
}
套餐管理
所有的操作跟菜品管理几乎一致,没什么注意点。
用于接收套餐详细信息的dto,另外包含了套餐与菜品的关系。
@Data
public class SetmealDto extends Setmeal {

    private List<SetmealDish> setmealDishes;

    private String categoryName;
}
控制层逻辑
@RestController
@RequestMapping("/setmeal")
@Slf4j
public class SetmealController {

    @Autowired
    private SetmealService setmealService;

    @Autowired
    private SetmealDishService setmealDishService;

    @Autowired
    private CategoryService categoryService;

    @PostMapping
    @Transactional
    public CommonResult addSetmeal(@RequestBody SetmealDto setmealDto) {
        Setmeal setmeal = new Setmeal();
        BeanUtils.copyProperties(setmealDto, setmeal);
        Long setmealId = setmealService.addSetmeal(setmeal);
        if (setmealId == null) {
            return CommonResult.error("添加套餐失败");
        }
        List<SetmealDish> setmealDishes = setmealDto.getSetmealDishes();
        if (setmealDishes.size() == 0) {
            return CommonResult.error("套餐中必须有至少一种菜品");
        }
        setmealDishService.addBatches(setmealDishes, setmealId);
        return CommonResult.success(setmealId);
    }

    @GetMapping("/page")
    public CommonResult getSetmealPage(PageParam pageParam) {
        List<Setmeal> setmealList = setmealService.getSetmealPage(pageParam);
        PageInfo pageInfo = new PageInfo(setmealList);
        List list = pageInfo.getList();
        list = (List) list.stream()
                .map(o -> {
                    Setmeal setmeal = (Setmeal) o;
                    SetmealDto setmealDto = new SetmealDto();
                    Category category = categoryService.getCategoryById(setmeal.getCategoryId());
                    setmealDto.setCategoryName(category.getName());
                    BeanUtils.copyProperties(setmeal, setmealDto);
                    return setmealDto;
                })
                .collect(Collectors.toList());
        pageInfo.setList(list);
        return CommonResult.success(pageInfo);
    }

    @DeleteMapping
    @Transactional    public CommonResult deleteSetmeal(@RequestParam(name = "ids") String ids) {
        List<Long> idList = convertIdsToList(ids);
        for (Long id : idList) {
            int count = setmealService.deleteSetmeal(id);
            if (count != 1) {
                log.debug("删除套餐 " + id + " 失败");
                throw new BusinessException("删除套餐失败,没有查到该套餐");
            }
            count = setmealDishService.deleteSetmeal(id);
            if (count == 0) {
                log.debug("删除套餐 " + id + " 失败, 无法更新菜品套餐关系表");
                throw new BusinessException("删除套餐失败");
            }
            log.debug("删除套餐 " + id + " 成功");
        }
        return CommonResult.success("删除套餐成功");
    }

    @PostMapping("/status/0")
    public CommonResult disableSetmeal(String ids) {
        List<Long> idList = convertIdsToList(ids);
        for (Long id : idList) {
            Setmeal setmeal = new Setmeal();
            setmeal.setId(id);
            setmeal.setStatus(0);
            int count = setmealService.updateSetmeal(setmeal);
            if (count != 1) {
                log.debug("停售 " + id + " 失败,数据库没有找到操作对象");
                throw new BusinessException("停售失败,请检查参数是否正确");
            }
        }
        return CommonResult.success("停售成功");
    }

    @PostMapping("/status/1")
    public CommonResult enableSetmeal(String ids) {
        List<Long> idList = convertIdsToList(ids);
        for (Long id : idList) {
            Setmeal setmeal = new Setmeal();
            setmeal.setId(id);
            setmeal.setStatus(1);
            int count = setmealService.updateSetmeal(setmeal);
            if (count != 1) {
                log.debug("启售 " + id + " 失败,数据库没有找到操作对象");
                throw new BusinessException("启售失败,请检查参数是否正确");
            }
        }
        return CommonResult.success("启售成功");
    }

    @GetMapping("/{id}")
    public CommonResult getSetmealDetail(@PathVariable Long id) {
        Setmeal setmeal = setmealService.getSetmeal(id);
        List<SetmealDish> setmealDishList = setmealDishService.getSetmeal(id);
        if (setmeal == null || setmealDishList == null || setmealDishList.size() == 0) {
            log.debug("查询 " + id + " 信息失败");
            throw new BusinessException("查询套餐信息失败");
        }
        SetmealDto setmealDto = new SetmealDto();
        BeanUtils.copyProperties(setmeal, setmealDto);
        setmealDto.setSetmealDishes(setmealDishList);
        return CommonResult.success(setmealDto);
    }

    @PutMapping
    @Transactional    public CommonResult updateSetmeal(@RequestBody SetmealDto setmealDto) {
        Setmeal setmeal = new Setmeal();
        BeanUtils.copyProperties(setmealDto, setmeal);
        int count = setmealService.updateSetmeal(setmeal);
        if (count == 0) {
            log.debug("更新 " + setmealDto.getId() + " 失败,没有查询到该对象");
            throw new BusinessException("更新失败,没有查询到该套餐");
        }
        count = setmealDishService.deleteSetmeal(setmeal.getId());
        if (count == 0) {
            log.debug("更新 " + setmealDto.getId() + " 失败,无法删除原先的口味关系");
            throw new BusinessException("更新失败,数据库错误");
        }
        setmealDishService.addBatches(setmealDto.getSetmealDishes(), setmeal.getId());
        return CommonResult.success(setmeal.getId());
    }

    private List<Long> convertIdsToList(String ids) {
        String[] idList = ids.split(",");
        List<Long> list = Arrays.stream(idList)
                .map(Long::valueOf)
                .collect(Collectors.toList());
        return list;
    }
}
以上,后台项目就告一段落了
=========================================================
前台项目要点不多,这里拣重点说
禁用套餐
首先来处理一下之前遗留的停售菜品后包含该菜品的套餐仍能被订购的问题。
思路:
- 当菜品被停售或删除后,修改套餐菜品关系表中的is_deleted字段,表示这条关系不再生效
- 订购套餐时,查询对应的套餐菜品关系表,检查是否有关系记录已经失效,如果有就代表当前套餐包含停售或已经删除的菜品,禁止用户购买。
@PostMapping("/add")
@Transactional
public CommonResult addItem(@RequestBody ShoppingCart cart) {
    List<ShoppingCart> shoppingCartList = shoppingCartService.getShoppingCart(cart);
    ShoppingCart shoppingCart = shoppingCartList.size() > 0 ? shoppingCartList.get(0) : null;
    if (shoppingCart != null) {
        shoppingCart.setNumber(shoppingCart.getNumber() + 1);
        int count = shoppingCartService.updateShoppingCart(shoppingCart);
        if (count != 1) {
            log.debug("添加购物车项目: [" + cart + "] 失败");
            throw new BusinessException("加入购物车失败");
        }
        return CommonResult.success("添加成功");
    }
    cart.setNumber(1);
    AdminUserDetail principal = (AdminUserDetail) SecurityContextHolder.getContext().getAuthentication().getPrincipal();
    cart.setUserId(principal.getId());
    cart.setCreateTime(new Date());
    if (cart.getSetmealId() != null) {
        List<SetmealDish> setmealDishList = setmealDishService.getSetmeal(cart.getSetmealId());
        for (SetmealDish setmealDish : setmealDishList) {
            if (setmealDish.getIsDeleted() == 1) {
                log.debug("尝试添加包含停售菜品的套餐, id: {}", cart.getSetmealId());
                throw new BusinessException("本套餐包含的部分菜品已经停售");
            }
        }
    }
    int count = shoppingCartService.addShoppingCart(cart);
    if (count != 1) {
        log.debug("添加购物车项目: [" + cart + "] 失败");
        throw new BusinessException("加入购物车失败");
    }
    return CommonResult.success("添加成功");
}
前台用户登录
前台用户的登录采用邮箱验证的方法,接收到用户请求后先检查验证码是否正确,如果正确,就去数据库中查询用户的信息。如果没有用户信息就直接注册。
该功能使用redis缓存验证码,并使用springboot提供的邮件发送功能。
<!-- 邮件服务 -->
<dependency>
    <groupId>org.springframework.boot</groupId>
    <artifactId>spring-boot-starter-mail</artifactId>
</dependency>
邮件需要的配置
mail:
  port: 25
  username: "邮箱号"
  password: "邮箱提供的令牌"
  host: smtp.163.com
邮箱服务实现
@Component
@Slf4j
public class MailService {

    @Autowired
    private JavaMailSender mailSender;

    @Value("${spring.mail.username}")
    private String username;

    public void sendSimpleTextMail(String content, String subject, String to) {
        SimpleMailMessage message = new SimpleMailMessage();
        message.setTo(to);
        message.setFrom(username);
        message.setText(content);
        message.setSubject(subject);
        mailSender.send(message);
        log.info("向" + to + "发送邮件成功");
    }
}
发送验证码
@GetMapping("/validate")
public CommonResult sendCode(String email) {
	StringBuilder builder = new StringBuilder();
	Random random = new Random(System.currentTimeMillis());
	for (int i = 0; i < 6; i++) {
		builder.append(random.nextInt(10));
	}
	redisTemplate.opsForValue().set("validation" + email, builder.toString(), 600, TimeUnit.SECONDS);
	mailService.sendSimpleTextMail(builder.toString(), "外卖系统登录验证码", email);
	log.info("验证码为:" + builder);
	return CommonResult.success("验证码发送成功");
}
用户登录逻辑
@Override
public String login(String email, String code) {
    String realCode = redisTemplate.opsForValue().get("validation" + email);
    if (!code.equals(realCode)) {
        return null;
    }
    if (getUserByEmail(email) == null) {
        User user = new User();
        SnowflakeIdUtils snowflakeIdUtils = new SnowflakeIdUtils(1, 1);
        user.setId(snowflakeIdUtils.nextId());
        user.setStatus(1);
        user.setEmail(email);
        int count = userMapper.insertSelective(user);
        if (count != 1) {
            throw new BusinessException("注册新用户失败");
        }
    }
    UserDetails userDetails = userDetailsService.loadUserByUsername(email);
    UsernamePasswordAuthenticationToken authenticationToken = new UsernamePasswordAuthenticationToken(userDetails, null, userDetails.getAuthorities());
    SecurityContextHolder.getContext().setAuthentication(authenticationToken);
    redisTemplate.delete("validation" + email);
    return jwtTokenUtil.generateToken(userDetails);
}
优化
数据缓存
对于菜品信息,种类信息这类会被频繁查询的内容,我们可以将他们放在缓存中,减少数据库的负担。
这里创建两个注解@Cache, @CleanCache,前者表示指定接口的返回值需要被缓存,一般用于查询接口,后者表示该接口执行完后要清理对应的缓存,一般用于数据库更新接口。
缓存切面实现
这里在实现过程中碰到一个小坑,如果某个形参与传入参数结合后为null,就无法识别到对应的方法。因此接口的形参应当尽量是一个能够封装入参的类型。
@Aspect
@Component
@Slf4j
public class CacheAspect {

    @Autowired
    private RedisTemplate<String, String> redisTemplate;

    @Pointcut("@annotation(com.bei.annotation.Cache)")
    public void cachePt() {}

    @Pointcut("@annotation(com.bei.annotation.CleanCache)")
    public void cleanPt() {}

    @Around("cachePt()")
    public Object cacheAround(ProceedingJoinPoint point) throws Throwable {
        Signature signature = point.getSignature();
        String className = point.getTarget().getClass().getSimpleName();
        String methodName = signature.getName();
        Class[] parameterTypes = new Class[point.getArgs().length];
        Object[] args = point.getArgs();
        String params = "";
        for (int i = 0; i < args.length; i++) {
            if (args[i] != null) {
                params += JSON.toJSONString(args[i]);
                parameterTypes[i] = args[i].getClass();
            } else {
                parameterTypes[i] = null;
            }
        }
        Method method = point.getSignature().getDeclaringType().getMethod(methodName, parameterTypes);
        Cache cache = method.getAnnotation(Cache.class);
        long expire = cache.expire();
        String name = cache.name();
        String key = name + ":" + params;
        String value = redisTemplate.opsForValue().get(key);
        if (StringUtils.isNotEmpty(value)) {
            log.info("缓存命中, {}, {}", className, methodName);
            return JSON.parseObject(value, CommonResult.class);
        }
        Object proceed = point.proceed();
        redisTemplate.opsForValue().set(key, JSON.toJSONString(proceed), Duration.ofMillis(expire));
        log.info("未命中缓存,保存本次返回结果, {}, {}", className, methodName);
        return proceed;
    }

    @Around("cleanPt()")
    public Object around(ProceedingJoinPoint point) throws Throwable {
        Signature signature = point.getSignature();
        String className = point.getTarget().getClass().getSimpleName();
        String methodName = signature.getName();
        Class[] parameterTypes = new Class[point.getArgs().length];
        Object[] args = point.getArgs();
        String params = "";
        for (int i = 0; i < args.length; i++) {
            if (args[i] != null) {
                params += JSON.toJSONString(args[i]);
                parameterTypes[i] = args[i].getClass();
            } else {
                parameterTypes[i] = null;
            }
        }
        Method method = point.getSignature().getDeclaringType().getMethod(methodName, parameterTypes);
        CleanCache annotation = method.getAnnotation(CleanCache.class);
        String name = annotation.name();
        Set<String> keys = redisTemplate.keys(name + "*");
        Object proceed = point.proceed();
        if (keys != null && keys.size() > 0) {
            log.info("数据库更新,清除缓存, {}, {}", className, methodName);
            redisTemplate.delete(keys);
        }
        return proceed;
    }
}
这种方法是手动实现缓存,除此之外还可以使用spring cache,能够更方便的实现缓存,并且也可以更轻易的实现比当前精度更高的缓存处理(这里在清除缓存时,会直接清空整个相关接口的缓存)。
Redis实现购物车
购物车方面也是一个可以使用缓存优化的点,目前的操作都是直接操作数据库,会有大量细碎的io,可以将用户对购物车的操作先缓存在内存中,如果用户在时限内完成操作提交订单,那全程都不需要数据库。如果超过某个时限,可以将目前在缓存中的数据先刷入数据库。
对于购物车项目采用散列的方式存储,键为食品id,值为序列化后的购物车项目实体,使用cart:id作为命名空间。这里注意的是,RedisTemplate的两个范型在散列中的体现是key和hashkey要属于范型类型,此外如果范型不同,那读取到的数据也会不同。
redis添加购物车项目的操作:
- 检查redis中是否存储了该项目,如果有就代表只是修改数量
- 如果没有存储就将其存入redis
这里还额外判断了一下,如果这是该用户首次往购物车存入数据,就添加一个更新数据调度。
@PostMapping("/add")
@Transactional
public CommonResult addItemRedis(@RequestBody ShoppingCart cart) {
    AdminUserDetail principal = (AdminUserDetail) SecurityContextHolder.getContext().getAuthentication().getPrincipal();
    String key = "cart:" + principal.getId();
    String foodId = String.valueOf(cart.getDishId() != null ? cart.getDishId() : cart.getSetmealId());
    if (cart.getSetmealId() != null) {
        List<SetmealDish> setmealDishList = setmealDishService.getSetmeal(cart.getSetmealId());
        for (SetmealDish setmealDish : setmealDishList) {
            if (setmealDish.getIsDeleted() == 1) {
                log.debug("尝试添加包含停售菜品的套餐, id: {}", cart.getSetmealId());
                throw new BusinessException("本套餐包含的部分菜品已经停售");
            }
        }
    }
    if (redisTemplate.opsForHash().hasKey(key, foodId)) {
        String item = String.valueOf(redisTemplate.opsForHash().get(key, foodId));
        ShoppingCart sCart = JSON.parseObject(item, ShoppingCart.class);
        sCart.setNumber(sCart.getNumber() + 1);
        redisTemplate.opsForHash().put(key, foodId, JSON.toJSONString(sCart));
        return CommonResult.success(foodId);
    }
    cart.setNumber(1);
    cart.setUserId(principal.getId());
    cart.setCreateTime(new Date());
    if (redisTemplate.opsForHash().keys(key).size() == 0) {
        addSchedule(String.valueOf(principal.getId()), 5);
    }
    redisTemplate.opsForHash().put(key, foodId, JSON.toJSONString(cart));

    return CommonResult.success(foodId);
}
在获取购物车列表时需要判断redis中是否有用户的数据,如果没有,就到数据库中查找并缓存,之后返回查询结果。如果redis中已经缓存过,就直接返回。
@GetMapping("/list")
public CommonResult getShoppingListRedis() {
    AdminUserDetail principal = (AdminUserDetail) SecurityContextHolder.getContext().getAuthentication().getPrincipal();
    String key = "cart:" + principal.getId();
    if (Boolean.FALSE.equals(redisTemplate.hasKey(key))) {
        ShoppingCart shoppingCart = new ShoppingCart();
        shoppingCart.setUserId(principal.getId());
        List<ShoppingCart> shoppingCartList = shoppingCartService.getShoppingCart(shoppingCart);
        for (ShoppingCart cart : shoppingCartList) {
            String foodId = String.valueOf(cart.getDishId() != null ? cart.getDishId() : cart.getSetmealId());
            redisTemplate.opsForHash().put(key, foodId, JSON.toJSONString(cart));
        }
        return CommonResult.success(shoppingCartList);
    }
    Set<Object> hashKeys = redisTemplate.opsForHash().keys(key);
    List<Object> list = redisTemplate.opsForHash().multiGet(key, hashKeys);
    List<ShoppingCart> shoppingCartList = list.stream()
            .map(o -> JSON.parseObject(String.valueOf(o), ShoppingCart.class))
            .collect(Collectors.toList());
    return CommonResult.success(shoppingCartList);
}@PostMapping("/sub")
public CommonResult subItem(@RequestBody ShoppingCart cart) {
AdminUserDetail principal = (AdminUserDetail) SecurityContextHolder.getContext().getAuthentication().getPrincipal();
String key = "cart:" + principal.getId();
String foodId = String.valueOf(cart.getDishId() != null ? cart.getDishId() : cart.getSetmealId());
if (!redisTemplate.opsForHash().hasKey(key, foodId)) {
log.debug("用户:{} 尝试删除不在购物车中的商品:{}", principal.getId(), foodId);
return CommonResult.error("购物车中没有该商品");
}
Object item = redisTemplate.opsForHash().get(key, foodId);
ShoppingCart sCart = JSON.parseObject(String.valueOf(item), ShoppingCart.class);
sCart.setNumber(sCart.getNumber() - 1);
if (sCart.getNumber() == 0) {
redisTemplate.opsForHash().delete(key, foodId);
} else {
redisTemplate.opsForHash().put(key, foodId, JSON.toJSONString(sCart));
}
return CommonResult.success(foodId);
}定时将redis中的购物车数据写入磁盘。调度的数据结构为有序集合,成员为用户id,分数为更新数据的时间戳。
/**
 * 添加更新购物车数据调度
 * @param uid 用户id
 * @param delay 延迟时长
 * */
private void addSchedule(String uid, int delay) {
	LocalDateTime now = LocalDateTime.now();
	LocalDateTime next = now.plusMinutes(delay);
	ZoneOffset zoneOffset = ZoneOffset.ofHours(8);
	redisTemplate.opsForZSet().add("schedule:", uid, next.toEpochSecond(zoneOffset));
}
添加定时任务配置类。
@Configuration
@EnableScheduling
public class SpringTaskConfig {
}
这里选择每隔5秒检查一下redis的存储情况。
取出离当前时间最近的调度,如果不存在,或该调度还没有到就直接跳过本轮搜索。
如果已到达调度时间,就开始将redis中的数据写入磁盘,完成后向redis存入下一次调度的时间。并继续取出下一个调度。
这里在插入数据时需要注意,有一部分数据是更新而非插入。这里通过更新操作的返回值判断是否有对记录造成影响,如果没有就代表是新记录,需要插入。
@Scheduled(cron = "0/5 * * ? * ?")
private void flushShoppingCart() {
    while(true) {
        Set<ZSetOperations.TypedTuple<String>> set = redisTemplate.opsForZSet().rangeWithScores("schedule:", 0, 0);
        ZoneOffset zoneOffset = ZoneOffset.ofHours(8);
        if (set == null || set.size() == 0) return;
        log.info("开始尝试将购物车信息写入磁盘");
        ZSetOperations.TypedTuple<String> min = set.iterator().next();
        Double time = min.getScore();
        log.info(String.valueOf(time - LocalDateTime.now().toEpochSecond(zoneOffset)));
        if (time - LocalDateTime.now().toEpochSecond(zoneOffset) > 0) {return;}

        String uid = min.getValue();
        log.info("将用户:{}的购物车数据写入磁盘", uid);
        redisTemplate.opsForZSet().remove("schedule", uid);
        String key = "cart:" + uid;
        Set<Object> hashKeys = redisTemplate.opsForHash().keys(key);
        List<Object> list = redisTemplate.opsForHash().multiGet(key, hashKeys);
        List<ShoppingCart> shoppingCartList = list.stream()
                .map(o -> JSON.parseObject(String.valueOf(o), ShoppingCart.class))
                .collect(Collectors.toList());
        for (ShoppingCart cart : shoppingCartList) {
            int count = shoppingCartService.updateShoppingCart(cart);
            if (count != 1) {
                count = shoppingCartService.addShoppingCart(cart);
                if (count != 1) {
                    log.debug("购物车信息写入磁盘失败,param: {}", cart);
                    throw new BusinessException("购物车信息写入失败");
                }
            }
        }
        addSchedule(uid, 5);
    }
}- 标题: 外卖商城项目
- 作者: Zephyr
- 创建于 : 2022-08-11 09:05:25
- 更新于 : 2023-01-26 12:32:46
- 链接: https://faustpromaxpx.github.io/2022/08/11/take-away/
- 版权声明: 本文章采用 CC BY-NC-SA 4.0 进行许可。